Introduction
This website is built using mdBook.
Installation
cargo install mdbook
Local Development
mdbook watch
This command starts a local development server. Most changes are reflected live without having to restart the server.
Build
mdbook build
This command generates static content into the book directory and can be served using any static contents hosting service.
Project Setup
In order to use the RTS Framework in your project, just clone the repository inside the Plugins folder of your project. We use Git LFS for large files such as assets or blueprints.
Source Structure
These are the listed main directories in Source/RTSFramework/Private in alphabetical order. Detailed explanations of the main classes and systems will be available in their respective section.
1. AI
Contains all the logic (conditions and tasks) for State Trees, which are the primary driver of entities' behavior. We have two distinct classes of AI:
1.1. Battalion
Entity Handles that contain one or more units will also have a battalion state tree that moves and controlls the behavior of the battalion. Since users only interact directly with entity handles, most of the logic to control entities starts here.
1.2. Unit
Each unit will also have their own State Tree component, which is mostly controlled by the battalion one.
2. Abilities
Abilities of GAS (see our GAS documentation). For now WIP and only used for combat (applying weapon damage to entity health)
3. Components
All the actor components that are owned by units, buildings, controllers etc.
4. Controllers
Gameplay controllers (view Controllers Architecture documentation under Code Architecture).
5. Entities
Entity - gameplay actor that is interactive for players. Basically it's a unit or a building. View the Setting Up Assets folder for further documentation.
5.1 Buildings
Contains subtypes of ARTSBuilding, such as resource buildings, rubbles or walls. We might want to refactor this to use components over inheritance in the future, for a more flexible approach.
5.2 Entity Configs
Entity configs are the main data entry points for entities. Since we don't spawn actors derived from ARTSEntity, ARTSUnit or ARTSBuilding directly, this data assets allow us to personalize each actor's data to represent different types of units, buildings, etc. More on this can be found in the documentation under Code Architecture > Configuration System
5.3 Units
Contains subtypes of ARTSUnit, such as builders or heroes. Same as buildings, we might want to refactor this so that it's based on configuration or components rather than inheritance.
5.4 Weapons
Reusable configs and classes for weapons.
6. Enums
Enums for anything. It also contains some other types (structs mostly) so we should consider renaming the directory.
7. GameObjects
Other Actors or UObjects that exist on a gameplay level but not directly controllable by Player like Entities. GameMode, GameState, PlayerStart, PlayerHandle, PlayerCamera, Niagara renderers, etc. Also contains Resources directory with classes for each gameplay resource.
8. Mass
Contains the relevant classes and data types that implement the MassEntity framework utilities. This is mostly related to high performance systems such as movement, projectile simulation, etc. Traits, Tags and Fragments define the entities themselves and the data they are associated with.
8.1. Processors
Processors are the main agents to run logic on the Mass framework. For example, the movement processor will contain the logic to run movement.
8.2. Rules
Since movement is based on a Boid simulation, the rules determine how entity forces are calculated. Subdirectory Battalion contains specific rules for battalion movement.
8.3. Utils
Classes related to Mass.
9. Networking
Utility classes for custom networking scenarios.
10. Settings
Classes derived from UDeveloperSettings. Used to store general data about the game settings, debug information, and game configuration in general.
11. Structs
General purpose structs. Maybe some of the ones in Enums should be moved here or both folers merged.
12. Subsystems
Useful singleton-like managers. We used them as glue between the gameplay code and Mass (for example in the case of the Unit Subsystem) or to handle general systems conveniently.
13. UI
Classes and widgets for the UI that is shown ingame, including data objects that will represent entities, spells and upgrades when displaying those in the UI.
14. Utils
Collection of different general purpose functions, libraries, classes etc., for maths or common game logic.
Entity Control Architecture
Since RTS games require a different approach to entity control, we've developed a system for player input/interaction based on several controllers and abstractions:
Architecture can be displayed in action when a player gives an order to units.
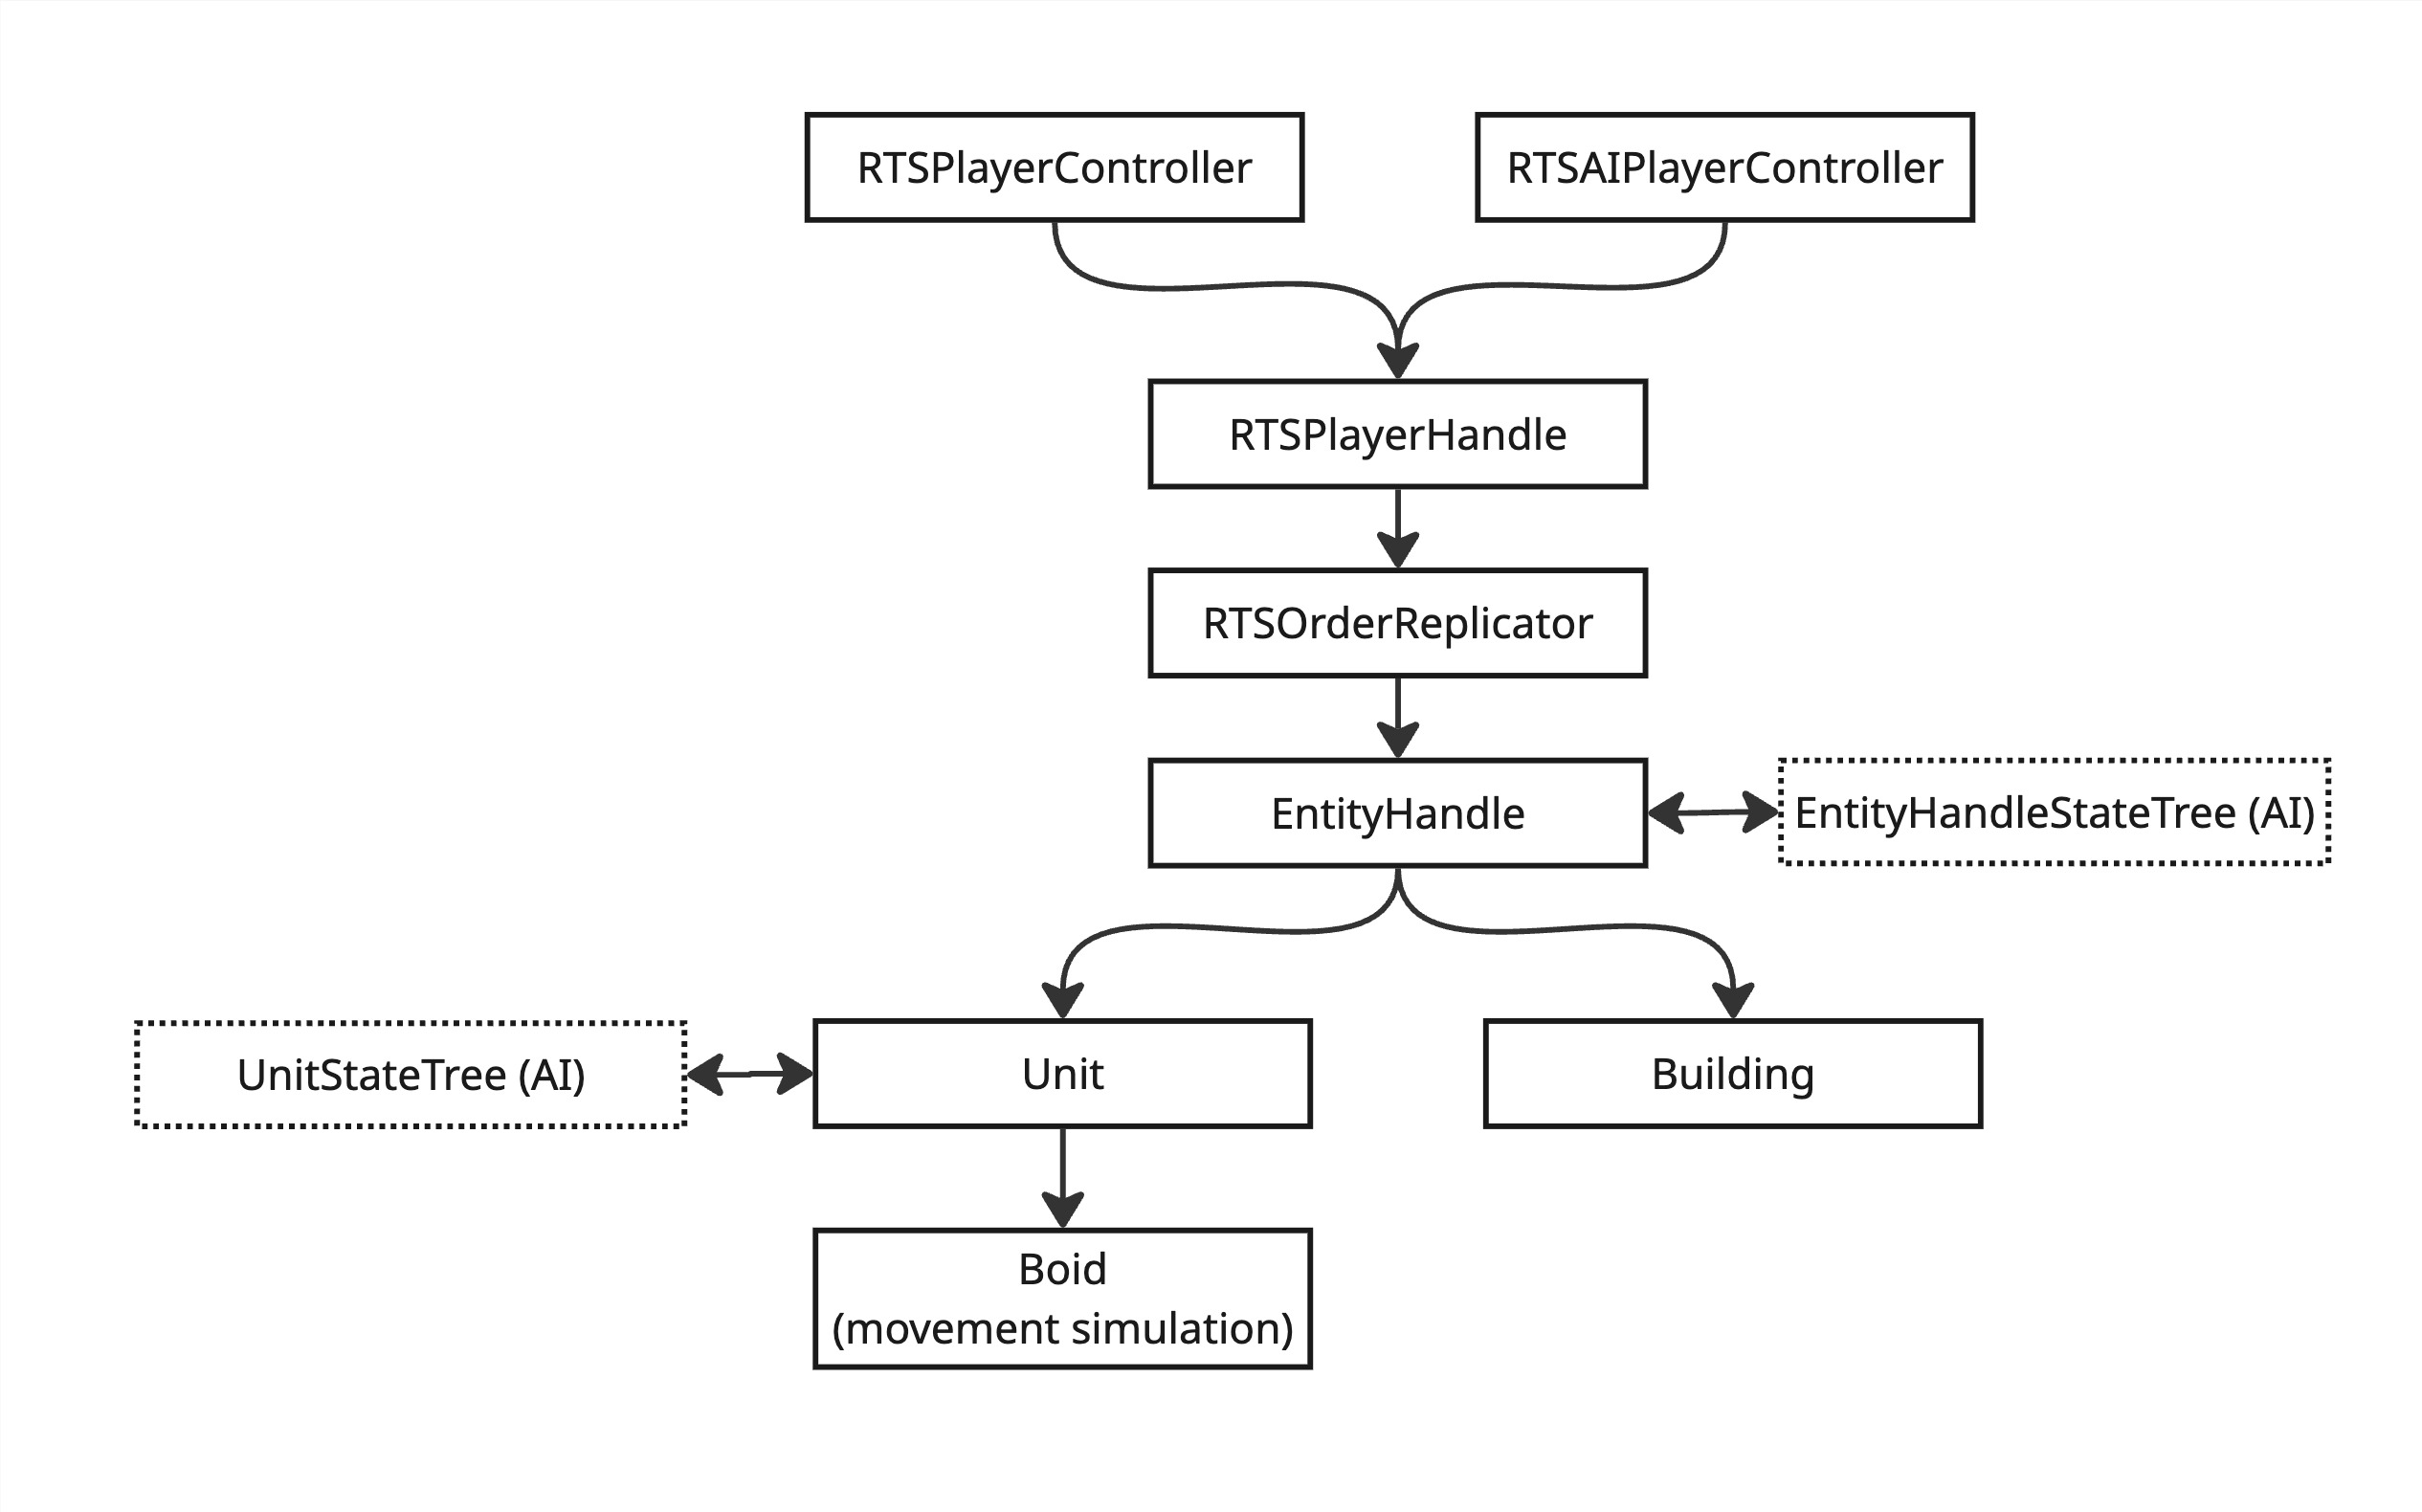
Let's start at the bottom.
1. Entity (units and buildings)
ARTSEntity is the base class for both units and buildings, and inherits from AActor. All the entities in the game that have health and have presence on the map will derive from this base classes, including building rubbles, neutral creatures, etc. As an ongoing effort during the development, we're trying to unify as much the common logic and rely on configuration and composition over inheritance as much as possible. This means that most likely, we will try to remove derived classes (such as RTSResourceBuilding) and replace with components (RTSEntityResourceComponent).
The main reason is that we want to be flexible. For example, we used to have RTSProductionBuilding (any building that can build units), RTSResourceBuilding (any building that produces resources), and RTSFortress. But if you know the BFME games at all, you'll realize that Fortresses can both produce units (Heroes and Builders), generate resources, and even purchase upgrades. Double inheritance would be a bad idea, and chaining inheritance wouldn't make sense either. Furthermore, units can also purchase upgrades! And maybe in the future we want some special unit that generates resources, or that can produce other units as well. The solution?
Move the functionality to components that can be attached to any ARTSEntity. In this way, we can select, mix and match any of those functionalities into a particular entity without worrying about their specific class. This is an ongoing process that is not complete, and we might still keep a few separated classes for specific entities as long as it makes sense, or if the benefits of the refactor are not high since we need to prioritise work efficiently.
1.1. Unit State Tree
Units have complex behaviors, determined by the orders received and other gameplay circumstances (for example, if they are knocked back or garrisoned inside another entity). In order to manage those situations effectively, we implemented Unreal's new State Trees (a lightweight version of Behavior Trees in a way), which follow a Finite State Machine pattern to manage states. For example, units will be in "move" state when running towards a target, or "attack" state when in range of an enemy.
1.2 Boid
Boids are the representation of units in the movement simulation. They drive the movement of units constantly based on the data input by the state trees and the unit itself. See Movement docs for a more complete explanation on the system.
2. Entity Handle
The class ARTSEntityHandle is an abstraction that represents a controllable item by the player. In BFME, units can be grouped into battalions. But the control over either units, buildings and battalions all behaves in the same way. For this reason, we decided to have an abstraction layer in the Entity Handle, that allows us to centralize all logic related to selection and order input. If a single entity (for example, a Hero or a building) is controlled, we still have an Entity Handle, that just happens to contain a single entity.
Entity Handles will perform actions based on their OrderQueue. This allows us to queue orders to be performed in sequence (such as when shift clicking), and it's the main data source for the entity handle state tree. The struct FRTSOrder is the data container for any order, and provides all necessary data for all orders to be performed.
Some complex orders will be able to issue more than one "sub-order" to the handle. For example, attack-move orders work as follows (simplified):
- Attack-move order is queued.
- The handle will first perform a "move" sub-order, towards the location clicked by the player. During the movement it will scan the surroundings to find enemies.
- When an enemy is found, an "attack" sub-order will be queued BEFORE the previous order (inserted in the array before the current attack-move order).
- After destroying the enemy target, the "attack" order is revoked and removed from the queue.
- Then, the entity will proceed to perform the next order in the queue, which happens to be the original attack move order.
2.1. Entity Handle State Tree
This only exists (for now) for handles that control units (but not buildings). It controls mostly the high level behaviour of battalions according to the order queue. There will be a rough correspondence of a order in the queue, and the state that the handle is in. For example the state tree will be in "move" state when a handle receives a "move" order, and when the move task is completed, the state tree will remove this order from the queue. It will also propagate the state to its entities. So when a "move" order is given, the handle state tree will notify units that they should switch to "move" state.
3. Order replicator
This class performs almost no gameplay logic in itself. It is introduced mostly to optimise the networking of orders in multiplayer.
When a player has selected several entities and issues a order for them, most of the data for their orders is common. For example if it's a move order, the destination (clicked map location) is going to be the same for all of them. Or if it's an attack order, the target entity is also going to be the same. If we issue a single reliable RPC for each entity, we are duplicating most of the order data, and also sending potentially dozens or hundreds of repliable RPCs in a single frame. This will fill the reliable RPC buffer with bad consequences for anything else that needs to be replicated over the net.
The solution is simple: We just pack the data into an order packet that has a list of affected handles, and the rest of the data (location, target etc) is only included once. Then on the receiving end, the order replicator will unpack the packet and issue individual orders to each entity.
It also has the additional benefit to provide a single entry point for all orders. Sometimes we need to order entities programmatically (for example, units can be ordered to exit a building after being purchased) and this ensures that the orders are consistent over the servers and client.
4. Player Handle
The ARTSPlayerHandle was introduced as a similar class to PlayerState, which is replicated to all clients (whereas player controller is only replicated to owning client). It is also common to both human and bot controlled players, so we can use a single interface for both.
Player Handle has logic to select entities, and to issue orders to the selected handles.
5. Player Controller
The RTSPlayerController handles human input. As such, it will link the enhanced input actions to gameplay logic. For example, it will detect when a player clicks on the map, and determine if it clicked a unit/building, or if it clicked the landscape while having units selected. Then it will forward the potential orders or actions to the PlayerHandle if conditions are met.
It will also perform actions that are local to the player - such as playing a unit "move" sound when ordering them to move, or centering the camera on a unit when double-tapping their control group.
Entity Configuration
In order to configure multiple different types of units and buildings, we follow a data-drive approach in which data assets are used to define all the data that entities use at runtime.
For example, the configs will contain values such as which mesh the entity is using for rendering, it's maximum health per level, it's movement speed, etc.
Configurations are set up in a modular approach so that we can reuse them amongst similar entities.
For example, the movement configuration (URTSBoidConfig) is a separate configuration that can be reused by multiple
units if they share the same movement stats.
1. Entity Config
The URTSEntityConfig is the base configuration class for both units and buildings, and contains shared
data such as health, UI selection data (description, portrait, etc). Some relevant parameters are:
- Entity Class: Specifies the actor subclass that will be spawned from this configuration. Should be set to
ARTSUnitfor example, if we're configuring a unit. - Default/Heavy Armor: Collection of values containing types of damage and their armor values. It is used when doing damage calculations. The armor value is a number between 0 and 1, which will be multiplied by the damage to attenuate it.
- Weapon Set: Map of targetable configs and the weapon that will be used when attacking that entity. For example if we define a weapon with
URTSBuildingConfigas key, this weapon will only be used when attacking buildings but not units. Define a weapon forURTSEntityConfigin order to have a default weapon that can be used against any entity.
1.1. Unit Config
The URTSUnitConfig is a derived class from the Entity Config, and defines data for all units. Some relevant parameters are:
- Rendering Mode: For performance reasons, we cannot just render skeletal meshes for all units, since the cost to compute animations on the CPU is quite high.
We therefore have two rendering modes available:
- Skeletal mesh: Recommended for heroes and monsters, since those are low in number and will look slightly better. Uses regular skeletal meshes and anim instance for animations.
- Static mesh: Implemented using Turbosequence plugin, it renders skeletal meshes as Niagara static meshes, really performant. Recommended for units in battalions.
- Banner Carrier Config: Config to spawn banner carriers. If blank, no banner carrier will be spawned when leveling up.
- Unit/Battalion state tree class: The state tree component class used for the AI. It is highly recommended that ALL units share the same class, so don't modify unless there is a explicit reason to do so.
1.2. Building Config
The URTSBuildingConfig is a derived class from the Entity Config, and defines data for all buildings. Some relevant parameters are:
- Collision2D and Avoidance Points: This ones are calculated at editor time (use call-in-editor function
CalculateCollision()) to bake collision data from the mesh. It will be used as static geometry data in movement calculations. - Mesh Collision: Simplified mesh used for collision (selection linetracing) and navigation.
- Navigation mesh small/big: Generates navigation modifiers at the specified scale so that battalions don't try to get too close to buildings when pathfinding.
- Navigation mesh small/big scale: Scales the navigation meshes. This allows us to reuse the mesh collision asset and just fine-tune the extent of the navigation modifiers by this values.
2. Boid Config
The boid config defines how units move in the boid (movement) simulation. Here, we have values for speed, max speed, acceleration, and we can also define the boid movement rules (arriving to destination, collision, avoidance etc):
- Mass Config: Reference to mass entity configuration. It should be the same for all boids, so do not modify.
- NavigationQueryFilter: The navigation filter used when pathfinding. It is recommended to use the single unit one for heroes and monsters, which ignores the buildings navigation areas, and use the battalion one for battalions, which tries to avoid getting too close to buildings.
- Formations: Array of formations that the unit can use. Use
SingleUnitFormationfor single units (heroes, builder etc.). This probably will be converted into a single reference since formation switching will be done through abilities. - Rules: List of rules for boid simulation. See the documentation for boid simulation for detailed information.
- Battalion rules: List of rules for battalion movement simulation. See the documentation for boid simulation for detailed information.
3. Formation Config
This one determines how many units exist in a battalion, and how they are positioned in formation. Contains mostly positional data for unit slots, banner carrier position, etc.
- Formation: Two-dimensional array representing rows and columns in a formation. The first dimension of the array defines how many rows/lines we have, and the second defines each slot per each line. It is highly recommended that we define rows from front to back, and slots in each line from left to right, so that all the logic related to adding/removing units, reversing formation and switching formation works efficiently. It is also recommended that the formation is layout around the (0, 0) position, so for example if there are three rows in the formation, the first one could be (200, x), second (0, x) and last one (-200, 0). This ensures that turning the formation around is smooth.
- Formation center position: Will be used to calculate collision against other battalions. It is recommended that it's on the (0, 0) position or close.
- Formation radius: Will be used to calculate the collision bubble around the battalion. Recommended that it encompasses all units inside the formation tightly. Use debug visualizers to adjust the value in game.
- Reverse formation on big turn: If the formation turns 180 degrees, we usually want to "reverse" the formation (meaning, that front row becomes last row etc) so that units don't have to cross each other. Recommended to be set to true unless it's a single unit.
- Formation size: It is automatically calculated in the editor when modifying the formation slots, and will determine how many units are in a battalion. It is not possible to use a smaller battalion size with a bigger formation.
4. Weapon Config
Defines the data necessary for damage and combat calculations, such as damage type, amount, wether the weapon does Splash/Area of Effect damage, knocks back units, etc.
- Pre-attack delay: Time in seconds between the unit being ready and in position, and the actual attack starting.
- Attack duration: How long the attack lasts in seconds. Attack duration comprises the time in which the animation starts playing, hits, and finishes. During this time, the unit is blocked from performing other orders.
- Hit times: Once that attack duration time has fired, how long until the damage is actually dealt. Supports multiple hits on the same attack.
- Reload time: Time in seconds after attack duration until the next attack (will go back to pre-attack delay).
- Damage execution calculation: GAS class to calculate damage. There is only one available, so use that one, already contains all necessary damage and armor calculations.
- Targeting mode: How this unit selects enemies:
- Closest: Will get the closest enemy unit.
- Random weighted to closest: Select a random enemy, but giving more priority to the closest ones. Recommended for ranged battalions to avoid overshooting one target.
- Animations: The animations played when using this weapon. Animations contain a "hit time" that has to be input, and should be the visual moment in the animation where blow is dealt. It is used to sync the visual damage time in the animation, with the actual damage logic hit (hit times).
- Radius and splash damage: If splash damage is active, it allows us to define a series of radiuses and the damage that will be applied to each radius. For example, we could have main damage of 400 for the main target, then 200 damage up to 200 distance units, and then 100 damage up to 400 distance units.
4.1. Simple ranged weapon
Ranged weapons that don't require physics or complex projectiles (basically, normal ranged units such as archers or heroes such as Legolas) should use this configuration. It will spawn a projectile that always hits the target and doesn't collide with enemies in the way. Basically it acts exactly the same as a melee attack, but delaying the damage until the projectile hits the target.
- Niagara mesh index: Since the projectiles are rendered as Niagara particles, we need to define the arrow meshes in the emitter and copy the mesh index here. Will probably be automated in the future.
- Mass config: Since projectiles are logically represented as mass entities, they all should use the same projectile mass configuration.
5. Sentry spawner Config
Some entities such as wild lair buildings, can spawn units that patrol the entity and protect it. The spawner config defines this behavior, and can specify which entities are spawned, the time to revive them if killed, etc. Although it can be attached to any entity, it's most likely going to be used with buildings.
- Producing creeps: array of units that will be produced by this component. If you want multiple units from the same type to be produced, just add two identical items to the array.
Movement simulation
When we setup on the journey to build an RTS game, we knew that the movement simulation would be one of the central and most complex pieces of technology we had to build, and we had to get it right. The challenges were multiple:
- Had to be really performant so that we can have hundreds and thousands of units in the field, and still have enough frame time to compute the rest of the game logic.
- Should be possible to sync over the network at an acceptable bandwidth and latency.
- Should support both battalion movement and individual unit movement (heroes, monsters, builders).
- Has to feel responsive, and units should behave in the least stupid way when facing obstacles, unreachable paths etc.
- Movement should feel realistic and match the detailed animations that BFME and Reforged use to create an immersive game experience.
Using Unreal's Character Movement Component was not a possibility - It is extremely expensive in both performance and network usage, too detailed for our purposes, and hard to modify.
After some research, we decided to build a 2D movement simulation based on the Boids artificial life program by Craig Reynolds. In this system, each entity (or boid) behaves according to a set of rules that are computed each frame and will determine the forces and therefore, velocity and position changes performed. This proved to be a really flexible framework in which we can add different behaviours to our units, such as moving in formation, avoiding other boids, avoiding static geometry, or colliding against each other.
It has the additional benefit of being easy to multithread, since each boid's movement can be calculated independently from the others (more details on that later). It is also very organic in nature, since each boid moves independently.
Battalions also have their own (vastly simpler) boid simulation - each battalion is a circle or bubble that encompasses all the units in the formation, and can collide with other battalions, follow a path, etc.
How it works (brief overview)
- Terrain and static geometry are computed into a NavMesh. We use Unreal's Recast implementation, which is configurable in the level via navigation volumes. Buildings modify the NavMesh when placed so that they are also taken into account when pathfinding.
- The pathfinding algorithm finds the best path from the battalion's current location to the destination point. The path is comprised of path points, which mark the different "steps" of the path and can mark direction changes, for example, when circulating around a building.
-
Battalions will try to move along the path, potentially colliding or avoiding other battalions or buildings. Units will follow the battalion in formation, following a straight path from their location until the desired formation spot. If there are obstacles on the way (other units, buildings etc) they will interact with them and try to reach their formation spot again as quickly as possible.
-
A unit can be "lost", that is, separated from their battalion. In those cases, the lost unit speed is allowed to be slightly higher than the maximum speed of the battalion, to allow catching up, and the unit uses global pathfinding in order to arrive to the position of its companions.
Battalion simulation
The battalion movement simulation was introduced as a higher level way to control organized unit movement. In this way, we can have battalions block or push each other. Furthermore, we have more control on scenarios where multiple battalions try to occupy the same spot, so that bigger armies move and arrive to destination in a more ordered manner. Individual units (heroes, monsters, builders...) also have their own battalion, although in this case it is comprised of a single entity.
The battalion movement simulation is comprised of the following phases:
1. Rule processing
Each battalion's position is inserted into a Quadtree. This allows us to do spatial queries to find other nearby battalions. We then can compute each rule to generate force vectors that will dictate the battalion's movement that frame. Each rule has a different weight between 0 and 1, so that we can calibrate the relative importance of each one.
1.1 Arrive Rule
This rule defines how the battalion follows their path (if any). It will generate a force vector clamped to the battalion's maximum movement speed, in the direction of the next pathpoint. Once the pathpoint is reached, we delete it from the path and continue moving towards the next one.
1.2 Avoid Rule
Battalions will sometimes collide. However, movement feels better if collisions are totally or partially avoided by changing direction when a clash is likely to happen. We achieve this by generating a force that is perpendicular to the line between both battalions. This will push the battalions sideways.
1.3 Collision Rule
Collision is computed as a strong force that will try to separate both battalions. We don't "teleport" battalions out of collision, rather, we push them softly. This is more friendly towards client/server setups and also resolves more organically when a collision does happen. In order to make unit movement friendly towards the player, collision is often NOT or partially calculated:
- Battalions from different teams (enemies) always block each other. This ensures that blocking armies and sorrounds are meaningful.
- Two battalions from the same team that move in different directions towards different destinations won't block each other, rather, we allow them to traverse normally to have smoother movement.
- Two battalions from the same team that move in the general same direction will block each other, so that they don't get mixed up during movement.
- If a battalion wants to occupy a destination that is already taken, it will push the idle battalion.
- If two battalions want to end movement in the same destination, the last one to arrive will push the other.
2. Velocity calculations
Once the rules have been calculated, we will have a 2D force vector that defines the direction and intensity of movement on that frame. We will clamp that vector to the battalion's max speed, to ensure that the combined result of the forces doesn't move the battalion too much, and apply this result to the velocity.
3. Location change
Once the velocity is calculated, we modify the location of the battalion for that frame, completing the movement.
Multithreading
By avoiding to modify the same attribute (location, velocity or forces) on the same phase, we can safely spread computations between threads:
- Rule processing: Reads location (for current and neighbouring battalions), and outputs forces.
- Velocity calculation: Reads forces and outputs velocity.
- Location change: Reads velocity and outputs new location.
Replication
Having a battalion-based movement system has the benefit of reducing the size of network sync payloads significantly (between 5 and 20 times smaller depending on the battalion size) - instead of updating each unit's individual position, in most situations we can just update the battalion's location, since it's the main indicator that units will follow when moving. Also, since units calculate movement smoothly, we can skip interpolation of battalion location updates - the battalion position will be corrected inmediately while units smoothly adapt their position to the new reference.
Boid simulation
The boid simulation is the lower level logic that rules each individual's movement. It is similar to the battalion simulation, but more complex and detailed. It comprises the sames general phases as the battalion simulation:
1. Rule processing
Each boid's and building position is inserted into a Quadtree. This allows us to do spatial queries to find other nearby entities. We then can compute each rule to generate force vectors that will dictate the boid's movement that frame. Each rule has a different weight between 0 and 1, so that we can calibrate the relative importance of each one.
1.1 Arrive Rule
Boids will move in a formation, the formation itself being (in a simplified way) a 2D array of spots. Each boid will be assigned to a spot so that they can calculate an offset from the battalion's center position. Since the battalion's center is moving along the path, units within a battalion will follow the same path (this avoids situations where units sorround a building from different sides while moving, for example).
1.2 Avoid Rule
Boids will sometimes collide. However, movement feels better if collisions are totally or partially avoided by changing direction when a clash is likely to happen. We achieve this by generating a force that is perpendicular to the line between both boids. Some exceptions apply:
- Avoidance won't be calculated if both units go towards the same direction, and with similar speed (since they won't collide in those circumstances).
- Avoidance won't be calculated if the other boid is behind.
- Avoidance won't be calculated if we're going to attach the other boid.
1.3 Collision Rule
Collision is computed as a strong force that will try to separate both boids. In the same fashion as battalions, we don't "teleport" boids out of collision, rather, we push them softly across frames. This is more friendly towards client/server setups and also resolves more organically when a collision does happen. It also allows for two boids to occupy the same space temporarily in corner case scenarios (for example, we prefer to have two boids in the same space rather than push one of them inside a building). Collision against static geometry works similarly, but has a higher strength so that it can override the rest of the forces. In this way we avoid the situation where all the other forces combined push a boid inside a building.
2. Velocity calculations
Once the rules have been calculated, we will have a 2D force vector that defines the direction and intensity of movement on that frame. We will clamp that vector to the boids max speed, to ensure that the combined result of the forces doesn't move the boid past that limit, and apply this result to the velocity.
3. Location change
Once the velocity is calculated, we modify the location of the boid for that frame, completing the movement.
Multithreading
By avoiding to modify the same attribute (location, velocity or forces) on the same phase, we can safely spread computations between threads:
- Rule processing: Reads location (for current and neighbouring entities), and outputs forces.
- Velocity calculation: Reads forces and outputs velocity.
- Location change: Reads velocity and outputs new location.
Networking
Unreal has a very good networking system. However, it is not designed to work at large scale unit counts.
While player-specific data (resources, spell points, team...) can be replicated. Taking inspiration in Lockstep systems (read this article about network code in Age of Empires), we are testing and implementing a non-deterministic, client-server system based on commands and low periodic state updates, which allows us to keep bandwidth low.
Entity AI
Entities need to perform complex behaviors on their own (or even when controlled by the player). Examples of such behaviors are targeting the closest enemy when figthing, detecting enemies in radius, avoiding buildings and other units whilst moving, getting back up and return to formation position when knocked back, or moving to a new position when changing formation.
In order to implement those behaviors in a clean, flexible, maintainable and extendable way, we decided to use Unreal's new State Trees, which provide a performant and convenient Finite State Machine with a graphical editor, conditions, tasks and transitions.
In the RTS Framework, AI works at two levels:
- Battalion AI: Handles the high level behaviours of the battalions and associated entity handles. For example, when a player issues a move order, the battalion will set a target and try to move towards it.
- Unit AI: Handles lower level behaviors at the unit level, such as attacking another entity, dying, moving to their formation slot, etc.
Let's examine how both are setup:
1. Battalion AI
The battalion AI is fundamentally driven by the order queue present in the entity handle. The order queue contains all actions input by players such as moving, attacking, holding position, etc. Therefore, there is a strong parallel between the order types and the high level tasks that the battalion performs.
The battalion state tree will also be the responsible to manage orders being performed, and removing them from the queue upon task completion.
Every time a new order is ready to be performed (either because the player issued an immediate order Perform_Now or Perform_Before, or because the next order in the queue is available)
the entity handle will notify the state tree via an event ("StateTreeEvent.Battalion.NewOrder").
The state tree will then abort the current task and reevaluate the tree.
Each state has an associated condition (derived from FStateTreeConditionCommonBase) which will check if the current order exists and is of a specific type.
For example the AttackCondition only returns true when the first order on the queue is of type attack:
bool FRTSStateTreeBattalionAttackCondition::TestCondition(FStateTreeExecutionContext& Context) const
{
	auto EntityHandle = Cast<ARTSEntityHandle>(Context.GetOwner());
	checkf(EntityHandle, TEXT("FRTSStateTreeBattalionAttackCondition is being used in a State Tree which is not owned by an EntityHandle actor"))

	if (EntityHandle->OrdersQueue.IsEmpty())
	{
		return false;
	}

	if (EntityHandle->OrdersQueue[0].OrderType != ERTSOrderType::ORDER_Attack)
	{
		return false;
	}

	return true;
}
If the condition is met, then the state tree will enter that state (and potentially any substate if present) and execute the associated task(s).
Each state tree task has usually three main logic entry points. Note that the code snippets are slightly edited from source code to simplify the examples:
- EnterTask: This is executed once when the state is entered, and should be used to do any initial setup, for example in the attack task, we do set some initial data on the task instance:
EStateTreeRunStatus FRTSStateTreeBattalionAttackTask::EnterState(FStateTreeExecutionContext& Context,
                                                                 const FStateTreeTransitionResult& Transition) const
{
	FInstanceDataType& InstanceData = Context.GetInstanceData(*this);
	InstanceData.TargetHandle = CurrentOrder.TargetHandle;
	InstanceData.OptionalTargetEntity = Cast<ARTSEntity>(CurrentOrder.OptionalTargetActor);
	InstanceData.bIsMovingTowardsTarget = true;

	return EStateTreeRunStatus::Running;
}
- Tick: If the task needs to perform logic every tick, this is the place. For example, the attack task checks if the target is too far, and checks when the enemy target is dead in order to consider the task succeeded.
EStateTreeRunStatus FRTSStateTreeBattalionAttackTask::Tick(FStateTreeExecutionContext& Context,
	const float DeltaTime) const
{
	const auto EntityHandle = Cast<ARTSEntityHandle>(Context.GetOwner());
	checkf(EntityHandle, TEXT("FRTSStateTreeBattalionAttackTask is being used in a State Tree which is not owned by an EntityHandle actor"))

	// If the current move order is removed for whatever reason, such as another order being issued
	if (EntityHandle->OrdersQueue.IsEmpty() || EntityHandle->OrdersQueue[0].OrderType != ERTSOrderType::ORDER_Attack)
	{
		return EStateTreeRunStatus::Failed;
	}

	FInstanceDataType& InstanceData = Context.GetInstanceData(*this);

	// If a new attack order has been given (targets have changed) abort and we'll restart the task
	if (HasTargetChanged(EntityHandle, InstanceData))
	{
		return EStateTreeRunStatus::Succeeded;
	}

	if (!InstanceData.TargetHandle.IsValid() || InstanceData.TargetHandle->IsDead())
	{
		// remove current completed order and notify that the task has succeeded
		EntityHandle->OrdersQueue.RemoveAt(0);
		EntityHandle->Battalion->Path.Empty();
		return EStateTreeRunStatus::Succeeded;
	}

	CheckTargetStatus(EntityHandle, InstanceData);

	return EStateTreeRunStatus::Running;
}
- ExitState: Is called when the task has succeeded or failed, can be used to do cleanup on the data. For example on the exit building task, we re-enable unit controllable state and stop march sound.
void FRTSStateTreeBattalionExitingBuildingTask::ExitState(FStateTreeExecutionContext& Context,
	const FStateTreeTransitionResult& Transition) const
{
	auto EntityHandle = Cast<ARTSEntityHandle>(Context.GetOwner());
	if (!IsValid(EntityHandle))
	{
		return;
	}

	// failsafe, in case anything happens, we still want to enable units to be controllable
	if (IsValid(EntityHandle->Battalion))
	{
		EntityHandle->EnableSelectivity();
		EntityHandle->SetUnitCollision(true);
		EntityHandle->SetBuildingCollision(true);
		EntityHandle->SetBuildingAvoidance(true);
	}

	if (IsValid(EntityHandle->HandleAudioComponent))
	{
		const auto EntityConfig = EntityHandle->GetEntityConfig();
		if (const auto UnitConfig = Cast<URTSUnitConfig>(EntityConfig))
		{
			EntityHandle->HandleAudioComponent->SetTriggerParameter(UnitConfig->MarchSoundStopTrigger);
		}
	}
}
1.1. Reference of Battalion AI states
List of current AI states for battalion. The names are self-explanatory:
- Idle
- Move
- Stop/Hold Position
- Patrol
- Exit Building
- Attack
- Attack-move
- Construct Building
2. Unit AI
Unit AI is mainly driven by the parent battalion AI (see previous section). However, there are some exceptions where the AI is driven by other gameplay logic: For example, when units die they will stop listening to any order from the handle (dead units are not controllable for obvious reasons) and just progress through the death states. Another example will be when units are knocked back (from spell, hit by a troll or trampled by cavalry). In that case, the entity is not responsive while on the floor and will take a bit of time to get back up and behave normally.
Contrary to entity handles, units don't have an order queue and just are "told" to switch states by external logic. For example to notify a unit that they need to switch to attack state, we set the enemy target data and send a new event to the state tree so that units switch the state.
void ARTSUnit::NotifyAttackState(ARTSEntityHandle* EnemyHandle, ARTSEntity* EnemyEntity)
{
	EnemyEntityHandle = EnemyHandle;
	OptionalEnemyEntity = EnemyEntity;

	NotifyStateToStateTree("StateTreeEvent.Unit.BattalionAttack");
}
The state tree tasks are setup in a similar way to battalion tasks (enter task, tick, exit task) so we will refer the reader to visit the above section instead of repeating ourselves.
2.1. Reference Unit AI states
List of all the possible unit AI states and theier subtasks:
- Idle: When doing nothing. The unit will still attack enemies in range and move to keep formation position if displaced.
- Move: When moving towards a destination.
- Attack: When ordered to attack. Units won't be in attack state until the battalion has arrived very close to the enemy target
and entered the "narrow phase combat radius".
- Waiting for target: Even if the battalion has been ordered to attack, the unit will get a concrete target from the enemy handle after a potentially async request. The reason is that in multiplayer only the server calculates targets and we need to wait for the results back to the client.
- Moving towards target: Once a target has been assigned, the unit will try to move towards it. If not possible (out of range or the unit is somehow blocked) we will request a new target after a delay.
- Attacking: Once the target has been reached, we will start performing the "attack loop".
- Pre-attack: Initial delay until the time to hit and attack animations are calculated.
- Attack duration: Time in which unit is actually dealing damage and playing attack animations. During this task the state tree is blocked from external input and the attack will always complete.
- Reload: Delay until the next attack (pre-attack) is ready. Will automatically transition to Pre-attack state to repeat the loop. The state tree remains locked in this task to avoid cheating (clicking multiple times on target to attack faster).
- Stop: When ordered to hold position
- Exit building: When spawned and exiting building, exiting a garrison building, or builder after construction finished.
- Knockback: When being knocked back, the unit will be in this state until it gets back up. State tree is blocked as well during this time.
- Dying: After a complete depletion of their health, the unit will start dying. This includes playing death animation, potentially rag-dolling, etc.
- Dead: After playing the death animation, the unit corpse will remain on the ground for a while, and sink slowly. This task will run until the entity actor is completely destroyed and cleaned up.
Subsystems
Unreal's subsystems are singleton-like UObjects whose lifetime is managed automatically by the Engine. They come handy to act as managers or central pieces of logic, specially for local (non-networked) features. Subsystems are easy to access from the context they are associated with, from any actor or object. For example, to get the Unit Subsystem (which is a World Subsystem) we can just:
const auto UnitSubsystem = GetWorld()->GetSubsystem<URTSUnitSubsystem>();
Current subsystems reference:
1. Building subsystem
Manages central logic for buildings, most notably, it holds an octree wthat stores all building positions and extents, very useful to make spatial queries (for collision or enemy detection for example). It has utility functions to query the octree, and to draw building-related debug visualisation.
2. Experience subsystem
Handles all the logic to grant experience (and splash/area of effect experience) for units.
3. Fog of War subsystem
The fog of war subsystem handles the data setup and input for the GPU calculated fog of war, and sets up the post process material. This should not be confused with the CPU-calculated fog of war (see URTSFogOfWarProcessor), which is calculated completely independently for entity vision and logic. This GPU-based fog of war is mostly for the visuals of the fog and done through post-processing. The fog of war texture is calculated in a Niagara emitter as a compute-shader.
4. Ragdoll subsystem
Currently an optional/experimental and WIP feature, which might never be used/completed. It handles ragdoll logic, mostly to set a limit on ragdolls (we don't want to have too many at the same time), and handle the transition between entity and ragdoll proxy actor.
5. Unit subsystem
Last but not least, the most complex susbsytem is the unit subsystem. It performs a series of central actions related to units such as:
- Instantiate and update unit octree.
- Instantiate and update entity handle (battalion) octree.
- Feeds positions of selected units to Niagara to render selection decal indicators.
- Ticks turbosequence manager for animations
- Creates the boids when units are registered and links both.
- Utility functions to get units in radius
- Functions to render unit/boid-related debug visualisation.
It handles the unit octree (for spatial queries, same as the building susbsystem), the entity handle octree (for battalion detection),
Player Controller
The ARTSPlayerController class is the main representation for the actual player during a game.
It handles player input, sets up the HUD class, etc.
Player controller also has importance regarding multiplayer setup, since it can perform server RPCs from clients. Remember that player controllers only exist in the server and the owning client, it is not replicated to all clients. Therefore, any logic or data representing a player that needs to be known to other clients should live in the player handle (or substitute for player state). For example, resources are handled by the player handle because we might want to see or interact with other player's resources (for example when transferring resources to an ally).
TODO: Add warning about legacy code in this class
Some relevant pieces of logic contained in the player controller:
Spawning the Niagara visualisation helpers
This actors and components handle Niagara visualisation for unit healthbars, fog of war and minimap compute shaders, rendering selected decals, projectiles, and visualisation lines for order queues (when pressing shift while having units selected).
GetWorld()->SpawnActor<ARTSNiagaraRenderActor>(BoidSettings->NiagaraActorClass)->SetActorLocation({0, 0, -1000});
GetWorld()->SpawnActor<ARTSNiagaraDecalRenderActor>(BoidSettings->NiagaraDecalActorClass)->SetActorLocation({0, 0, -1000});
GetWorld()->SpawnActor<ARTSNiagaraProjectileRenderActor>(BoidSettings->NiagaraProjectileActorClass)->SetActorLocation({0, 0, -1000});

auto GeneralSettings = GetDefault<URTSGeneralSettings>();
UINiagaraActor = Cast<ARTSUINiagaraRenderActor>(GetWorld()->SpawnActor(GeneralSettings->UINiagaraActor));
Entry point to get UI data
See function ARTSPlayerController::GetDataForUISlot(ERTSUISelectableSlotsEnum Slot, uint8 Page, AActor* SourceActor)
Input setup
We migrated all our mouse/keyboard inputs to Unreal's new Enhanced input system. The input actions are defined in Blueprints, and
assigned to logic functions in the player controller. See function ARTSPlayerController::SetupInputComponent() for a complete list of inputs and functions.
Mouse clicking and dragging
All functionality related to mouse clicks on the map, selecting units etc is performed on the player controller. TODO: Expand or write specific section
Control group management
Functions to create control groups, select them, add/remove units, and focus camera on a specific control group.
Building placement logic
Should probably be refactored to builders or other classes, complex setup currently.
Wall setup (deprecated)
Old code to build walls. Should be moved to a separate component and updated with all new entity logic. Low priority.
Player Handle
The ARTSPlayerHandle is a companion class to player controller, that exists for both humand and AI players,
and unlike player controller is replicated to all players (like the player state class). As such, we use it to centralise
logic that is common for both human and AI controllers, and needs to be known to all clients in game. This includes resource management,
entity orders, etc.
Entity selection
The player handle holds an array of selected units, and also provides utility functions to select and deselect new entities:
const TArray<ARTSEntityHandle*>& GetSelectedHandles() const;
void TrySelectActors(const TArray<AActor*>& Actors);
void SelectHandles(const TArray<ARTSEntityHandle*>& EntityHandles);
void AddHandlesToSelection(const TArray<ARTSEntityHandle*>& EntityHandles);
void DeselectAllHandles();
void DeselectHandle(ARTSEntityHandle* Handle);
bool IsAnyHandleSelected() const;
ARTSEntityHandle* GetFirstSelectedHandle() const;
ARTSEntityHandle* GetHighestPriorityHandle() const;
/** Ensures that only buildings or only units are selected at the same time, we don't allow mixing them */
void SanitizeSelectedHandles();
Limited and reviable entities
Since number-limited entities (such as heroes or heroic units) are handled per player, the player handle is a good class to centralise the logic. These are the reference functions:
// Logic for player limits on hero and limited unit purchase
bool CanLimitedEntityBeProduced(URTSEntityConfig* EntityConfig) const;
void NotifyLimitedEntityPurchased(URTSEntityConfig* EntityConfig);
void NotifyLimitedEntityDead(URTSEntityConfig* EntityConfig);
bool CanHeroBePurchased(URTSEntityConfig* HeroConfig) const;
bool IsHeroAlive(URTSEntityConfig* HeroConfig) const;
TOptional<FRTSHeroRevivalInfo> GetHeroRevivalInfo(URTSEntityConfig* HeroConfig) const;
void NotifyHeroAlive(ARTSEntityHandle* HeroHandle);
void NotifyHeroDead(ARTSHero* Hero);
Resources
Player Handle is the actor to which player resources component is attached, so that we can access per-player resources from any client.
Gameplay
This section contains explanations to various of the central gameplay features for an RTS game.
Fog of War
The fog of war is a central feature in most RTS games. It limits player vision to the vision of their units and buildings, providing a layer of strategy in which players will try to gain information through scouting, using spell powers, and having map control of key points. Likewise, players will try to use their opponent's blind spots to launch secret attacks on their base or buildings, sorround their armies, etc.
In the RTS Framework, vision is calculated two times independently, for performance reasons. A first pass on the CPU will calculate logic vision, which will tell our gameplay code which entities are visible to the player, we'll use this information to hide/show unit and building meshes, play or freeze animations, etc.
A second pass in the GPU will calculate the actual visible fog, which is applied via a post-process material into the world to darken non-visible areas.
Even if vision is calculated two times, the logic for both is almost identical.
1. The vision grid
Vision is calculated and represented on the map as a 2D grid. Each cell will either be visible or not visible for a particular player.
We will start by getting the landscape (the actor that represents the actual map/level and geometry) and creating a grid over it. The size of the grid is configurable but performance tests suggests that 128x128 is a good size. The bigger the grid resolution, the more expensive all vision calculations become. Since it's a 2D system, it's size increases at a squared rate. A 128x128 grid has 16.384 cells. A 256x256 grid (two times bigger) has 65.536 cells. Therefore, keeping the grid resolution small will provide tangential performance results.
The GPU-calculated FoW is more performant, so we can afford to have a 256x256 grid there.
TODO: insert debug visualisation screenshot of level and grid
2. Vision bitmasks
In order to represent vision, we use bitmasks that are generated from team info. Each player has an index, and each team has an index as well. Since vision is granted per team,
we use the team index to generate a bitmask. In the constructor for the FRTSTeamInfo struct:
FRTSTeamInfo(int32 PlayerIndex, int32 InTeamIndex) : PlayerIndex(PlayerIndex), TeamIndex(InTeamIndex)
{
	TeamIndexBitmask = pow(2, TeamIndex);
}
The exponential function has the interesting effect of creating a bitmask in which only the selected value (in this case TeamIndex) bit is shifted, so for example:
- TeamIndex = 0:
Bitmask = pow(2, 0); // Bitmask is 1. The binary representation would be00000001(using an 8 bit representation for convenience, the real int is 32 bits in game so it supports more values). - TeamIndex = 1:
Bitmask = pow(2, 1); // Bitmask is 2or in binary,00000010. - TeamIndex = 3:
Bitmask = pow(2, 3); Bitmask is 8or in binary,00001000.
As you can see, the bit that shifts is the one corresponding to the team index, starting on 0. This is really useful because now we can have a single bit representing the player team vision.
Given an unique bit for each team, we can now perform bitwise operations on bitmasks to store and calculate vision.
For example, we can store a single int32 in the vision cell, that represents which players have vision over that cell.
We can use the bitwise OR operator(|) which will return 1 if any bit in the combination is 1.
const uint8 Team3Mask = pow(2, 3); // 8 or 00001000
const uint8 Team1Mask = pow(2, 1); // 2 or 00000010

const uint8 CombinedMask = Team3Mask | Team1Mask; // 00001010
Now we have a single int representing vision for both teams. In order to know if a team has vision over a cell,
we can use the bitwise operator AND (&) that will only return 1 if both bits are 1.
const uint8 Team2Mask = pow (2, 2); // 4 or 00000100

//Assuming CombinedMask is 00001010 as in the previous example:
const uint8 VisionResult = Team2Mask & CombinedMask; // 0 or 00000000 since none of the bits are 1 in the same position
If the vision result is 0, the cell is not visible by that player.
Computing vision
Now that we have a grid and a system to store per-player vision and know which teams can see which cell, we can proceed to actually compute the vision. We will loop through all units and buildings, and calculate a circle around them. This circle will be calculated as follows:
const int32 Top = FMath::Clamp(Location.Y - Radius, 0, FogOfWarSubsystem->LogicGridSize - 1);
const int32 Bottom =  FMath::Clamp(Location.Y + Radius, 0, FogOfWarSubsystem->LogicGridSize - 1);
const int32 Left =  FMath::Clamp(Location.X - Radius, 0, FogOfWarSubsystem->LogicGridSize - 1);
const int32 Right =  FMath::Clamp(Location.X + Radius, 0, FogOfWarSubsystem->LogicGridSize - 1);

for (int Y = Top; Y <= Bottom; Y++)
{
	for (int X = Left; X <= Right; X++)
	{
		const float DistanceSquared = FVector2D::DistSquared(Location, FVector2D(X, Y));
		if (DistanceSquared < Radius * Radius)
		{
			LogicVisionGrid[X][Y] |= TeamVisionBitmask;
		}
	}
}
After computing the vision, we know which players see which cells in the whole map, and can act in consequence.
Therefore, we're currently using a TQueue to store player bitmasks before combining them.
Computing entity visibility
Finally, we just need to ask the cell that units/buildings are in if the cell is visible by the player. If so, we will set their status to visible. Else, we'll set their status to invisible.
Buildings are an exception because they remain visible but un-animated after being seen:
// Get if building is currently visible
const int32 CurrentVisionResult = CombinedCornerVision & PlayerVisionBitmask;
// Get if building has been seen in the past by this player
const int32 ExploredVisionResult = PlayerVisionBitmask & Building->GetExploredBitmask();

// Store the current vision in the building, so that we can know if it has been seen previously
Building->SetExploredBitmask(CombinedCornerVision);

ERTSBuildingVisibilityStatus VisibilityStatus = NotVisible;

// Buildings remain visible once explored
if (ExploredVisionResult != 0)
{
	VisibilityStatus = Seen;
}

// Buildings seen in the past freeze their animations
if (CurrentVisionResult != 0)
{
	VisibilityStatus = Visible;
}

Building->SetVisibility(VisibilityStatus);
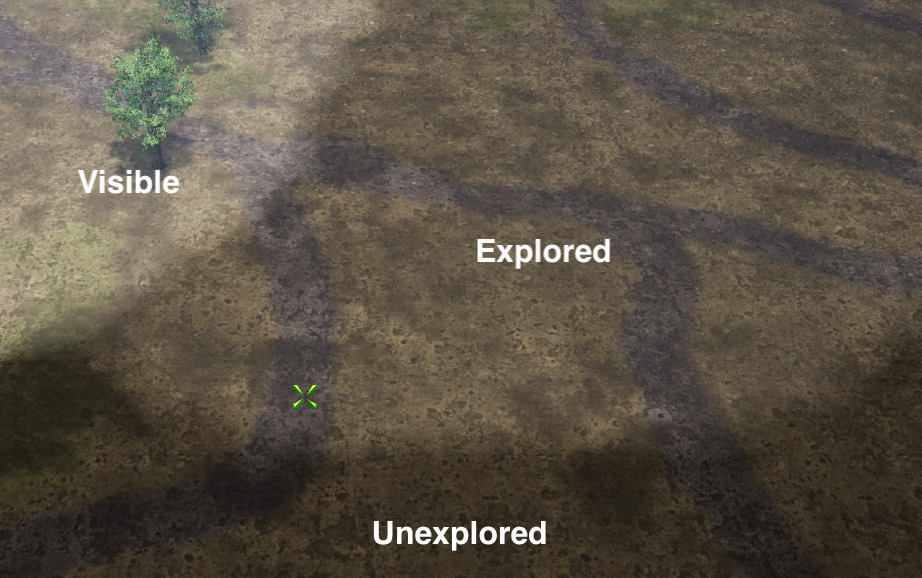
Visible vs Explored FoW
Unlike the original BFME games, and inspired by Starcraft2, we support two types of visibility statuses, which are only relevant for GPU computed FoW.
- Visible: Cells that are visible currently, in this frame. This value is reset and recalculated every frame.
- Explored: Cells that have been seen at some point by the player. This value is calculated every frame as well, but not reset. This allows players to understand which areas of the map they have already scouted or seen.
Animation system
Playing animations for the relatively high amounts of units required in an RTS game can be tricky from a performance point of view. Skeletal meshes require lots of CPU frame time on the game thread, and will issue lots of draw calls which also slows down the render thread. Fortunately, a number of solutions are available to Unreal developers, including Vertex Animated Textures, and our current setup, Turbosequence, a high-performance animation system that computes bone transforms in worker threads and renders units as instanced static meshes through Niagara, reducing significantly the amount of draw calls required.
Even if Turbosequence renders meshes with very nice quality, there are some drawbacks, so we still use skeletal meshes for entities that are reduced in number and can benefit from higher quality rendering. Those include heroes and monsters, for example.
Since we wanted to be able to support both animation systems, we designed an architecture that would detach the animation logic (when to play an animation, how to transition between them, blending, speeding up/slowing down, freezing, etc) from the actual immplementation of the concrete animation. In this way we can reuse almost all the animation logic without caring is units use Turbosequence or Skeletal meshes. If we need to add another animation system, we just need to write the implementation and the logic will keep working the same.
Animation Controller Component
The main logic class for animations in the animation controller component. The flow to switch an animation is as follows:
SwitchAnimation(ERTSAnimEnum NewAnimation, const TArray<UAnimSequence*>& OverrideAnimationAssets, float OverridePlaySpeed)
A new animation is triggered. This is the entry point and external classes will call this function to try to switch animation. An optional array of overridden animations can be passed. For example, attack animations use this override because each weapon can use different animations to attack.
Optionally we can also pass an override for play speed, in case we need to play the animation faster or slower, for example under the influence of an attack speed boost.
- ``
Levels
The following components need to be added to a Level in order for it to be functional in-game. For this Tutorial page we assume that you've already got a Level provided by a map designer, and as such we won't go into details for all the components that a level consists of, like lighting etc.
RTSVisionVolume
This Volume is required for Fog of War to function. The Brush Settings and Location need to be set up in a way that the Volume broadly exceeds the level landscape. This to ensure the Fog of War will work correctly.
RTSFogOfWarActor
This actor is what holds the functionality for the Fog of War and its material. After adding the actor to the level, you can add the material by clicking on the actor in the World Outliner of the level (top right) and going into the Details panel.
Under the section RTSFog Of War Actor, add the "M_RTSFogOfWar_Final_Inst" as the material. You can search for it or manually find it in Content/UI/Ingame/Material. Be sure to use the _Inst version!
Now, under Fog Of War Volume, add the PostProcessVolume. It should be the only option available, as long as the PostProcessVolume is present in the level.
NavMeshBoundsVolume
The NavMeshBoundsVolume, as the name suggests, will dictate the bounds of a map. Only within the bounds can units move. Ordering units outside the bounds does not work, so keep this in mind with where you place the bounds and map design (if applicable). The best is for borders to truly be at the edge of the landscape, to avoid order issues.
The size of the NavMeshBoundsVolume should be set via the Brush Settings (X,Y,Z) in the Details panel. Along with the Location of the volume, that should be all that you need to set up for it.
PostProcessVolume
Generally this volume is already added by the level design artist. As such, we won't go into details here. What you need to know is that this volume does not need to be sized or positioned. It has no bounds, as long as the option Infinite Extent (Unbound) is checked in the Details panel under Post Process Volume Settings.
BP_Player
In order to possess a player in-game, we need to add them to the level. We do this by searching for BP_Player in the Content folder. You will see that we have 4 of them, named BP_Player_X. At the very least, you should add BP_Player_1 to the level. Drag and drop it onto the location that the player should spawn with its initial building.
To set the initial building, we then go into the World Outliner of the level, click on BP_Player_1 and head over to the Details panel. Under the section BFME you'll see the option Initial Actor, this is where you set the building to start with.
You can also tweak the Initial Spell Points and Initial Resource Points in this section, but later in development these will be dictated by the map settings that a player has set from the menu.
BP_BattleGM
Now we need to add the game logic to the level via a Game Mode. Without this, the level will simply crash. To add it, go into the World Settings of the level (next to the Details panel). Under Game Mode and then GameMode Override you need to add BP_BattleGM. Along with this comes a preset of settings, no need to tweak them. Fog of War is enabled/disabled in this class, via the bHasFogOfWar flag.
Droppables
If you need just to test unit or set some neutral creeps on the map you need to create blueprint and set it inherited form needed basic class. In our case, it is the Unit class.

Open up blueprint and click on the EntityComponent.

Here you need to set EntityConfig in settings. Also you can set team. By default all neutral units have 66 team index (to be nice and friendly to each other).
Click at the Skeletal Mesh and here you can set some preview mesh for convenience. But in-game it will be replaced by mesh that was specified in the EntityConfig

After that you'll be able just to drop blueprint on the map. Unit will create all other stuff like Handle and set itself PlayerController and then assign it to neutral team by default. If you produce your own units in a production building, you'll be able to attack this spawnable unit
*Group size is also working in this option. If you set 6 as a group size, when the game starts, the other 5 units will be spawned at the location of the first unit. So at first, you might not notice other units as they all will be at one exact spot. You can set sentry tactic in blueprint settings and all units will start move around the specified distance.
Setting Up Units
In this tutorial we will be teaching you how to set up a new unit within the Unreal Editor of our project using our Entity Component system. This system reduces repetition and avoids hardcoded values, all for ease of use in designing and testing.
Relevant classes
The system is divided into blocks:
1. Entity: Describes a unit, building or any other game object. It defines what it is, how it looks, how much health it has, but not what it can do.
- Relevant subclass for this tutorial - RTSUnitConfig
2. Ability: Abilities that could be utilized via the in-game bottom right Palantir menu for buildings or units and clicked by the player. Describes what logic entity can do. We utilize the GAS system for this, so refer to the UE GAS documentation for further details.
3. Weapon: Describes what an entity can do in simple attacks. A unit can have many weapons, so you can create separate weapons assets and use them in different Entity Configs.
- Responsible data class - RTSWeapon.
4. OnHit: Most weapons use common logic for attacks, so they don't need an extra logic module. But some weapons may have additional effects like poison or setting the enemy on fire. Like with abilities, we have two classes:
- Responsible data class - RTSOnHitConfig.
- Responsible logic class - RTSOnHit.
The OnHit module is like a warhead that could be attached to any weapon, and it will do some logic whenever a unit attacks.
From all classes listed above, you may make a custom inherited data asset if it is a data class or blueprint if it is a logic class. Using all those blocks, you can create a fully customizable game unit.
Entity
So let's start our tutorial with creating an Unit. First, we need to arrange the folders:
- Create a Unit folder in a related Units directory. For the main repo the example is Content\Units\FactionName\Unit
- Create the proper subfolders (Animations, Materials, Meshes, Textures, UI).
- Assume we've just received all needed assets from our modelers and placed it by drag-n-drop to their respective folders.

Now we need to create a config.
Every entity - unit, building, lair, etc. needs a config. That is the place where we store all the data like health, damage, animations. It's easily accessible and configurable.
Basically it is just a Data Asset inherited from RTSEntityConfig or other RTS***Config class. Inherited means you have to pick this class when you create an asset/blueprint and you get the search field (second screenshot below). You can create a Data Asset by right-clicking in file explorer, and navigating to the Miscellaneous tab.

Type "unit" in the search bar.

Create a new asset and call it EC_[UnitName], so for example EC_Unit. It’s best to name it with a related prefix to avoid any confusion when we'll have a lot of files in the project.
During development some fields or sections in this config may be changed / moved / removed. As such, the screenshots below may be outdated at the time you read this.
We’re now ready to open our Data Asset and set up the unit. We’ll be going through all the (sub)sections that the asset is composed of:
- Construction
- Unit
- Attack
- Type
- Health
- Abilities
- UI
- Vision
- Experience
Construction
Group Size - How many units will be in the group (horde).
Resources Cost - The resources it costs to build the entity.
Command Points Cost - The command points required to build the entity.
Time Of Production - The time the unit production process takes, from when it starts. Only one unit per building can be produced at a time, the rest is placed into a queue.
Unit
Max Walk Speed - The maximum speed when walking/running.
Unit Skeletal Mesh - Place the unit’s Skeletal Mesh (SK)
Unit Static Mesh Collision - Place the Static Mesh with collision of the unit here. NOTE: currently we auto-generate the collision from the unit, and this field may be left empty. We are, however, still figuring out the most optimal way to handle this. Maybe after future bug testing we will need this field again.
Has Collision - Turns collision on/off. We are going for a realistic collision, so you should check this box.

Formation - Here we can set the formation of the horde. Right now we have:
- Line: Units will stand in a singular horizontal line. Pick this option for single units as well.
- Two Lines: Units will stand in a formation of two horizontal lines. This is our standard horde formation.
- Square: Units will stand in a square formation.
- Random Circle: Units will form in a messy, circle-shaped formation.
- Count: Units will form in a random, messy formation.
Retreating Distance - Currently this feature is broken, it’s supposed to set the Retreating Distance for auto attacks, just like for creeps. It doesn’t work at the moment.
Spawn Time - Other than you may expect, this is the time between a unit spawning and a unit becoming controllable by the player. It is to prevent spawn issues and/or play out spawn animations before a unit can be controlled.
Bannerman Config - Here you should set the EC for the related bannerman of the horde. For now, you may leave this empty. Further documentation about this will follow, the system isn’t fully prepared yet.
Animation - In this section we will be bringing the unit to life! We’ll be adding animations to make the unit functional. The files needed for this section should be available in the Animations folder of your unit.

Animations - there are multiple animation states as seen above. We’ll quickly go over them.
- Anim Idle: Animations that play when a unit is idle (standing still).
- Anim Run: Animations that play when a unit is moving.
- Anim Hit: Animations that play on hit. NOTE: Currently this state is currently not used and may be left empty.
- Anim Spawn: The spawn animation that plays when a unit is spawned in. Often this should be the most suitable animation from Run. Sometimes a unit has a custom spawn animation.
- Anim Die: The unit's death animation.
Change Idle Anim Rand Range - You can set up multiple animations for each state. For the Idle state, there is a random range in which the unit will play through its animations. Between X and Y seconds.
Blend Idle Anim Time - This blend time is used to blend between idle animation states. It’s meant to make the transitions smoother, for now we landed on the standard value of “1”.
Blend from Run Anim Time - This works similar to Blend Idle, but instead it does not blend between run animations, but rather between the run animation and switching to another state (like Idle). Unlike idle animations, run animations do not play between different animations during movement. This is to make movement look smoother. At the start of movement, the unit will pick one of the run animations, and stick to that.
Attack
Is Weapon Enabled - Whether this unit can attack. Uncheck for builders (porters).
Acquisition Radius - Radius in which the actor will automatically select and attack targets, in cm.
Chase Radius - Radius around the home location of the actor it won’t leave when automatically attacking targets, in cm. This is a function left from the RTS plugin, it currently is not functional.
Weapons - Properties of the default weapon (e.g. Arc for Legolas or archers). Here we will set weapons for this entity. More on that in Chapter 2 - WEAPONS.
Crushable Level - The crushable level of the entity. Currently we don’t have crush mechanics yet, but later on this value will determine the entity’s weakness against it.
Type
Entity Class - Point out what class of entity to spawn. We are working on making a list that describes all classes, for now we focus on the Unit class.
Is Neutral - This defines whether the entity will be “neutral”, like wild creeps (wargs and trolls on the map). Those will attack any player, they don’t pick sides. Do not check this for Entities intended to be used by players. (Neutral entities are part of team 66).
Health
Current Health - This is the health value that an entity spawns with. Almost in any case this should be equal to Maximum Health. Setting this value lower will mean the entity starts out hurt.
Maximum Health - The Maximum Health that an entity spawns with.
Current Armor - This defines what armor type the unit spawns with. Almost always this should be set to “Default”.
Default Armor - The default armor the entity spawns with, if Current Armor is set to Default. This defines the strengths and weaknesses of a unit. We don’t yet utilize it, but it is already functional and handled by the GAS system.
Heavy Armor - An upgraded armor state for the entity.
Abilities
Abilities - Array of abilities, made and handled through the GAS system. Make sure you do not remove elements from the map. It may crash the game!
UI
UIName - The name the entity will display in the UI.
UIDescription - The description the UI will display in the description box.
UILevel Requirement - The level requirement that will be displayed in the description box. Leave it at 0 if you do not need to display anything.
UICurrent Level - Should be set by CurrentLevel from the Experience category.
UIMax Level - Should be set by MaximumLevel from the Experience category.
UIHealth - Should be set by MaximumHealth from the Experience category.
UIDamage - The attack damage shown in the description box. As everything in UI, this is just visual!
UICost - Should be set by ResourcesCost from the Construction category.
UIShortcut - Visual representation for the hotkey of this entity. We currently do not have this functionality built. Leave it empty.
UICommand Points - Should be set by CommandPointsCost from the Construction category.
UIPurchase Level - Should be set by CurrentLevel from the Experience category.
UIIs Passive Ability - This is used for the description box for abilities. Units do not utilize it, leave it unchecked.
Portrait - The portrait that will be displayed in the bottom right Palantir Menu when the entity is selected.
Icon - The button icon that will be displayed for this entity.
Vision
Sight Radius - Radius in which the actor reveals areas covered by fog of war, in cm.
Experience
Current Experience - The experience the actor will spawn with. Almost always should be left at 0.
Current Level - The level the actor will spawn in. For units this almost always should be level 1.
Maximum Level - The maximum level the actor can get. For units the general BFME use case is level 5.
Experience Points for Each Level - The experience points required for the entity to level up to the next level, customized per level. Units gather this through the Bounty value of other actors. If setting this up, please notice that the Array starts at 0, and this means level 1. So, Array 0 is the experience required from level 1 to 2, Array 1 is the experience required from level 2 to 3, etc. This means the size should always be MaximumLevel -1.
Calculation: [0] = 5 exp is the required exp to reach level 1.
[1] = 10 exp is the required exp to reach level 2.
And so on.
Bounty - Experience given to units (other actors) when the actor dies.
Splash Radius - Distance between our dying actor and the furthest enemy getting the experience bounty.
Production Experience - Experience given to a production building when this actor is spawned. If we want to manually leveling up buildings, this should be left at 0.
Abilities
Weapon
At this point, we have a spawnable and controllable unit. But it can't do anything. Here modules come into action. First, let's create a weapon for our Unit. It'll be a data asset inherited from RTSWeapon. We have RTSWeapon for melee attacks and, surprise, RTSRangedWeapon for ranged attacks.

Give the new asset its proper name, example: W_UnitSword. Open it.

Weapon Name - Give your weapon a name. Currently this has no direct use case yet, but do it anyways so we don’t need to come back to it later.
Preattack Delay - Determines the time before a unit deals damage during the attack.
Delay Between Shots - Determines the delay before the unit can perform an attack again.
Firing Duration - Determines how long the attack itself lasts (animation).
Damage - Damage dealt by this weapon.
Damage Type - Type of damage caused by this weapon. For now, we can leave this on DAMAGE Default. More on damage types here.
Damage Exec Calc - Attacking is handled by the GAS system. We need to set this value to RTSDamageExecCalculation in order for the damage to register.
Damage Scalars - Map of entity types to damage multipliers - eg. 200% dmg vs monsters.
On Hit Data - Array of configs with special OnHit logic (e.g. buffs). This is additional logic for our current attack. More on this in Chapter 3 - ONHIT.
Animations - Attack animations of this weapon (so you set these here, this animation type isn’t part of the main EC config).
Can Fire While Moving - Can the unit attack while moving? For melee infantry attacks, the answer is almost always yes. But for example, archers or siege can’t.
Range - Range of this attack, in cm. Even melee attacks have a range, it will be about 100-200.
NOTE from Solethria: I don’t believe the following functions are functional yet. It was made before I joined.
Splash at Target - Whether the area damage has the attacker or the target as center.
Splash Radius - Area Damage Radius.
Splash Arc - Cone width in degrees, so we don’t hit enemies at the back.
Clip Size - How many attacks before reload is triggered. This does not apply to melee damage.
Auto Reloads Clip - Should reload automatically? Does not apply to melee.
Clip Reload Time - Different from Delay Between Shots.
Icon - The weapon icon. Currently has no function yet, it will be used for weapon switches.
Now we should set our new weapon in the Unit Entity Config:

And that's it, our Units are now able to fight!
OnHit
This chapter is outdated, will be updated in the future.
Now our unit can use default attacks, but what if we want to make poison or flame effect when the Unit attacks someone? For that we have OnHit modules.
Logic module.
First let's create logic blueprint inherited from RTSOnHit (same we can do in C++, but let's keep it simple)
If we want this module to be used by other units, we most likely want it to create in common folder like Content\OnHit .

Call it BP_OnHitPoison
Here our parent class provides some useful events which will be triggered in a certain conditions. All here we need is to use them.

Short description from our code:
/** Function called by AI controller when damage caused during melee attacks */
OnHitMelee(TArray<AActor*> OnHitActors, AActor* DamageCauser);

/** Function called by AI controller when projectile arrived at destination point
and damage has been caused during ranged attacks */
OnHitRanged(TArray<AActor*> OnHitActors, AActor* DamageCauser, ARTSProjectile* Projectile);

/** This function will be called in both cases after OnHitMelee and OnHitRanged */
OnHitTarget(TArray<AActor*> OnHitActors, AActor* DamageCauser, ARTSProjectile* Projectile);

/* Function will be called when projectile spawned and configured*/
OnSpawnProjectile(AActor* DamageCauser, ARTSProjectile* Projectile, AActor* TargetActor);

/** Called when projectile hits any actor in the air during it's traveling to destination point */
OnProjectileScratch(TArray<AActor*> OnHitActors, AActor* DamageCauser, ARTSProjectile* Projectile);
So basically what we want here is get OnHitMelee event and do something with a target. As we see in the code, this event provides TArray<AActor*> OnHitActors which is an array of actors that our unit hits. That made because some units can damage many targets in one attack. But in most cases in this array will be just one target entity.
Since we don't want any exact number in the logic modules, we have here a function for retrieving data that will be passed to our module (about data itself a little bit later). The function is just named GetData.

And here we can look for all stuff we can get from it.

Right now we are interested to get damage parameter from it.
So in this blueprint, we iterate through an array and apply damage. And make it print something for debug purposes.

Data module
Second, let's create a data asset for our poison module. We need to inherit it from RTSOnHitConfig. Just remember that we create not a blueprint but a data asset from Miscellaneous tab in the editor.
Create it in our Unit's folder, as data will be specific for only our unit

Open it up.

For now, we have here few fields, but we will add a lot more later. Set here name, and damage.
All those fields can be used in the OnHit logic module. Just ask GetData function.
And the main part is - we need to connect this data asset to logic module. In the field "On Hit Class" set our just created OnHit logic module. It is a blueprint in our case, but in other cases programmers will provide you the needed logic modules, so you might set here a C++ class.
So, OnHit is ready, let's add it to our weapon. Open up W_UnitSword and add new OnHit config into array.

Here we can add as may OnHits as we want and all they will fire their events and do all logic in-game as unit attacks any target.
Now we can test it in game and see our prints on the display and damage in log.

Builders
In order to create a building within the game, we utilize the Builders. Builders are the workers of a faction that can create buildings.
Once you create a builder, you can click on him and a Builder Bar will pop-up on the right that shows all the buildings you can create Currently not setup in the DEMO project.
Click on the building and select a spot.
NOTE: If the building icons have not been setup, be aware that the building buttons show up in black. If you hover over the button, you'll see the name of the building that it creates.
How to set it up yourself
For testing purposes, you may want to add build options to the porter. You can do so by typing "playercontroller" in the Unreal Editor searchbar. BP_PlayerController will show up, open it.
On the right side, under RTS > Construction you see the "Buildings" section. There you can add new buildings to the list by clicking on the + icon (Adds Element). Add your EC_[BuildingName] to the list and you are good to go!
NOTE: If you get the message "Cannot add a new key to the map while a key with the default value exists", this is because there is a building present with key 0. Unreal wants new entries to have the 0 key, so change the current key to the lowest available unique number that isn't 0 and you'll be able to add a New Element.
Setting Up Buildings
In this tutorial we will be teaching you how to set up a new building within the Unreal Editor of our project using our Entity Component system. This system reduces repetition and avoids hardcoded values, all for ease of use in designing and testing.
Relevant classes
1. Entity: Describes a unit, building or any other game object. It defines what it is, how it looks, how much health it has, but not what it can do.
- Relevant subclass for this tutorial - RTSBuildingConfig
Entity
So let's start our tutorial with creating a Building. First, we need to arrange the folders:
- Create a Building folder in a related Buildings directory. For the main repo the example is Content\Buildings\FactionName\Building
- Create the proper sub-folders (Animations, Materials, Meshes, Textures, UI).
- Assume we've just received all needed assets from our modelers and placed it by drag-n-drop to their respective folders.
First we need to create the configuration. Every entity - unit, building, lair, etc. must have a config. It is the place where we store all data like health, damage, Static Meshes (SM), etc. Basically, it is just a Data Asset inherited from RTSEntityConfig or otherRTS***Config classes. Inherited means you have to pick this class when you create the asset/blueprint and you get the search field (second screenshot below).
You can create data assets by right-clicking in the file explorer in the Unreal Editor and navigating to the Miscellaneous tab > Data Asset.

Type "building" in the search bar and pick RTSBuildingConfig. Press Select, the Data Asset will be created, and you’ll be prompted to rename it.

Our EC files should always use the naming convention EC_[InsertName]. For the sake of this tutorial, we’ll use EC_BuildingTutorial

During development some fields or sections in this config may be changed / moved / removed. As such, the screenshots below may be outdated at the time you read this.
We’re now ready to open our Data Asset and set up the building. We’ll be going through all the (sub)sections that the asset is composed of:
- Building
- Type
- Health
- Construction
- Abilities
- UI
- Vision
- Experience
Building
Start Construction After Spawn
This defines whether a building starts its build phase when spawned, or is spawned “finished” immediately. For the normal RTS building scenario, you should check this box.

Producible Units
In this section, you can add unit EC’s to your building. The building will then be able to produce these units per the data provided in their Data Assets.

Spawn Relative/Rendezvous
This section allows you to define the spawn location for your produced units. The Spawn Relative Location is the initial spawn position, while the Rendezvous Location is the position the units will move towards when they are spawned. More info on how to define these values in this guide.

Building Meshes
In this section we will be bringing the building to life! We’ll be adding Skeletal Meshes (SK) and/or Static Meshes (SM) to make the building functional. The files needed for this section should be available in the Meshes folder of your building.
Mesh L1 - Mesh L2 - Mesh L3
Those are the standard meshes for each level of the building. Currently, we’re only making the level 3 appearances, so we’ll insert the same meshes for all three levels. Almost always, this will be the Idle (_Idl) file. NOTE: In order for the building to be producible, you NEED to at least add a Static Mesh to the Mesh L1, even when the proper Skeletal for appearance is available, as can be seen in the picture below. The L1 Static Mesh is used to define the collision when you are selecting a spot to build the building in-game.
Mesh Damaged 1 - Mesh Damaged 2 - Mesh Destructed
In this section you’ll define the destruction phases of the building. The assets will be named _D1 and _D2 accordingly. The Destructed phase is where a building is destroyed. This asset is named _Dest.
Mesh Collision
While the SM under Mesh L1 defines the collision check for the build phase, the Mesh Collision will define the collision once a building is completed. Currently, there are no scenarios where the collision differs between the two, so the same Collision file is used. If you do not have a Static Mesh or its collision isn’t set up, follow this guide to generate it.

Building Animations
This section works almost identical from the Building Meshes section. The main differences are that unlike in Mesh L1 from Building Meshes, there are no exceptions attached to Anim L1 in Building Animations. Also, the naming conventions work the same. For each state, you have the option to choose between Animation Assets or Materials. Sometimes our artists will opt for just a change in material in parts of the destruction phase to adjust only the appearance, instead of also including a new animation. You’ll know this as either an Animation asset or Material asset will be present with the correct naming convention, like _D1.
As such, we’ll be needing the files in the Animations folder or Materials folder of your building, depending on the assets made by our artist.

Decal
Decals are materials that are projected as textures on surfaces, in this case on the ground. It’s important the Rotation is set to Y -90 to make the Decal horizontal and thus be able to project it. Other than that, we’ll not go into more details on gathering these values. They should be provided by the artist via a Blueprint that functions as reference. If we do not set a Decal, a green placeholder Decal will be projected.
You’ll need the _Fund material found in the Materials folder of your building.

Type
Entity Class
Point out what class of entity to spawn. We are working on making a list that describes all classes, for now we focus on the ProductionBuilding class, used for producing units.
Is Neutral
This defines whether the entity will be “neutral”, like wild creeps (wargs and trolls on the map). Those will attack any player, they don’t pick sides. Do not check this for Entities intended to be used by players. (Neutral entities are part of team 66).
Health
Current Health
This is the health value that an entity spawns with. Almost in any case this should be equal to Maximum Health. Setting this value lower will mean the entity starts out damaged.
Maximum Health - The Maximum Health that an entity spawns with.
Current Armor - Currently armor should not be utilized for buildings and as such be left on “Default”.
Default Armor - The default armor the entity spawn with, if Current Armor is set to Default.
Heavy Armor - An upgraded armor state for the entity. Currently we do not utilize this for buildings, and this will remain the case for most buildings in the future.
Construction
Resources Cost - The resources it costs to build the entity.
Command Points Cost - The command points required to build the entity. For buildings, this is always left on 0.
Time Of Production - The time the building production process takes, from when the Porter starts it. The building animation also properly adapts its speed according to this time.
Abilities
Abilities - These are abilities handled by the Gameplay Ability System (GAS). Currently, these are not used for buildings.
UI
UIName - The name the entity will display in the UI.
UIDescription - The description the UI will display in the description box.
UILevel Requirement - The level requirement that will be displayed in the description box. This does not apply to buildings, but in any case is just visual. Leave it at 0 to not display.
UICurrent Level - Should be set by CurrentLevel from the Experience category.
UIMax Level - Should be set by MaximumLevel from the Experience category.
UIHealth - Should be set by MaximumHealth from the Experience category.
UIDamage - The attack damage shown in the description box. This does not apply to buildings, leave it at 0 to not display.
UICost - Should be set by ResourcesCost from the Construction category.
UIShortcut - Visual representation for the hotkey of this entity. We currently do not have this functionality build. Leave it empty.
UICommand Points - Should be set by CommandPointsCost from the Construction category.
UIPurchase Level - Should be set by CurrentLevel from the Experience category.
UIIs Passive Ability - This is used for the description box for abilities. Buildings do not utilize it, leave it unchecked.
Portrait - The portrait that will be displayed in the bottom right Palantir Menu when the entity is selected.
Icon - The button icon that will be displayed for this entity. In a building’s case, in the builder bar (doesn’t show up yet).
Vision
Sight Radius - Radius in which the actor reveals areas covered by fog of war, in cm.
Experience
Current Experience - The experience the actor will spawn with. Almost always should be left at 0.
Current Level - The level the actor will spawn in. For a ProductionBuilding the general BFME use case is to start at level 1.
Maximum Level - The maximum level the actor can get. For ProductionBuilding the general BFME use case is level 3.
Experience Points for Each Level
The experience points required for the entity to level up to the next level, customized per level. For buildings, this is only used for resource buildings, they gather experience through producing resources. ProductionBuildings in might level up via manually purchasing the level-up upgrade. If setting this up, please notice that the Array starts at 0, and this means level 1. So, Array 0 is the experience required from level 1 to 2, Array 1 is the experience required from level 2 to 3, etc. This means the size should always be MaximumLevel -1.
Calculation: [0] = 5 exp is the required exp to reach level 1.
[1] = 10 exp is the required exp to reach level 2.
And so on.
Bounty - Experience given to units (other actors) when the actor dies.
Splash Radius - Distance between our dying actor and the furthest enemy getting the experience bounty.
Production Experience - Experience given to a production building when units spawn from it. This value is not meant for buildings, leave it at 0.
Collision & Navigation
Generally speaking, our asset artists provide us with the Static Mesh for collision. If they did, all we need to do is set up the navigation for it. If they did not, or you are working with temporary assets, we can also do this ourselves!
Collision
If you have no Static Mesh (SM), open up the Skeletal Mesh (SK). From here, we can generate an SM by clicking on the Make Static Mesh option. If you can’t see this option, open up the window in full screen. Make it and save it in the same folder as your SK. Call it SM_[EntityName]_Collision. So, for example: SM_UrukPit_Collision.

Since we generated the SM ourselves, it has no collision yet. Going this route, we assume you are requiring this for testing or temporary purposes. As such, going for a fast and simple solution will suffice. Open up the SM and go to the Collision tab > Add 18DOP Simplified Collision.

Then go into the Details panel on the top right, go to Collision and make sure the Collision Presets is set to Building.

Navigation
Now we have set up the collision, we need to mark our building for the navigation system. This allows for the collision to be used by UE4’s navigation system to calculate territories where units cannot go. It’ll make unit movement smarter, because they will avoid the collision and go around the building.
In the Details panel, go to the Navigation section. Here, we make sure that Is Dynamic Obstacle is checked, which then allows us to pick NavAreaBuilding as the Area Class. We uncheck Create on Client (NOTE by Solethria about Create on Client: not sure whether that is required and/or good or bad, I’m following the original guide setup).
That’s it, now units will actively walk around your building.
Spawn positions
As described in Step 1, the Spawn Relative Location allows you to define the spawn location for your produced units. The position is evaluated from the center of the building's mesh. Here’s how to get the right coordinates:
-
Create a blueprint inherited from "ProductionBuilding" to make a droppable entity (as per the Creating A Droppable guide).
-
Set a preview mesh. Either SK or SM, click on their respective tabs on the left, then set the mesh in the Details panel.

- Select +Add Component on the top left and add a Cube. Drag it inside the building mesh to set it where the spawner should start. When you are done, write down the coordinates from the Details panel. You will use those in the config. Do the same for where the units should spawn to (walk to). Now you have the Spawn Relative Location and Rendezvous Relative Location. Be sure to test them out in-game. When you are happy with them, you should delete the droppable blueprint because we created it just for previewing the coordinates.
Resource Buildings
All about resource buildings mechanic: from how to manage it in editor to how to work with code base.
Configuration
- Resource Generated Amount. Base amount resource building will generate each Generation Time seconds. 25 by default.
- Income Lowest Bound. Income can be not less than this value. 4 by default.
- Command Points Gained. Self-explanatory. 50 by default.
- Generation Time. How fast resources will be generated in seconds. 6 by default.
- Circle Radius. Income calculating area circle radius. 2000 by default. (TODO: in what?? Doesn't connect with MI_Selection).
- Terrain Coefficient. How much any other buildings affect on income. 1 by default. Only buildings counts.
- Income Algorithm Depth. It will be described lately. Higher value - higher income calculating precision. 20 by default.
- Resource Multiplier. It's an array with two elements: first for level 2, second for level 3. 1,2 and 1,35 for default.
- Income Lowering Pattern. Describe how the amount of generated resources will decrease for each new constructed resource building. For first eleven buildings values are 1, 1, 1, 0.95, 0.9, 0.9, 0.9, 0.85, 0.79, 0.76, 0.73. That means, if there is just one resource building, penalty is 1 (full income). It's same for two and three buildings. For four buildings penalty is 0.95 (new income is Resource Generated Amount x 0.95). After eleven buildings penalty will be raise for each two new resource buildings. So, for thirteen new buildings it will be Resource Generated Amount x 0.95 - 1 etc. But no less than Income Lowest Bound.
Income calculating algorithm
- Algorithm creates a circle of dots. Income Algorithm Depth affects how many dots there will be.
- Algorithm searches for every resource building placed in circle with radius Circle Radius x 2.
- For every dot in circle, if it's in circle of another resource building, algorithm is removing this dot.
- Algorithm searches for every building in Circle Radius x 2 radius.
- For every remaining dot in circle, if it's inside some building's bounds, algorithm is removing this dot.
- Multiply number of dots removed in 5 by Terrain Coefficient.
- Return num of remaining dots divided by num of initial dotes.
Building
First you need to add ability to BP_PlayerController (like here). Then, create building at any suitable place.
Income calculation
There are two cases income is calculated:
- While current resource building is created.
- When near resource building was destroyed.
Resource building creating
So, you clicked on ability button, and now a yellow circle is appeared with percentage in the center. While you move this circle around, income is calculated every tick. When you will place new resource building, income will be calculated last time, and this value will be stored.
Resource building destroying
When somehow resource building was destroyed, it searches for all buildings around. Then, all buildings check time destroyed resource building was constructed, and if it was constructed earlier than them, they recalculate their income.
5. Walls
Herein, we describe how to set up walls and wall-related assets in BFME: Reforged. Later on, we will describe the state of development of the wall system, its architecture, some limitations/areas for improvement, and known issues.
Setting up wall assets
Before diving into specific instructions for setting up wall assets in particular, please review the instructions for setting up buildings in general, here.
Creating the entity configuration
When creating the entity configuration data asset, set the Data Asset Class to either RTSWallHubConfig or RTSWallSegmentConfig. You should be able to find both by typing "wall" into the search box. If you want to set up a wall hub asset, choose the former. Likewise, if you want to set up a wall segment asset, choose the latter. Please see the instructions below for details on setting up each of these configuration data assets.
RTSWallHubConfig

In addition to the configuration options available to all buildings, the following should be set for wall hubs as well:
Material Flicker Time
When a wall is being planned by the user, the building cursors used to plan construction (the transparent meshes) are designed to change color if a player attempts to build a wall in an invalid manner. This can be caused by invalid terrain, lack of resources, or attempting to build a wall too far from one of the player's fortresses. These are just examples, and other restrictions on gameplay may be developed later. In any case, when changing materials from the valid material to another material, the planned wall pieces will flicker between two different materials, to make it easier for the player to identify why the wall cannot be built.
This configuration variable dictates the duration of the flicker, in seconds. For instance, if the value is set to 0.25, the material on the walls would be Material A for 0.25 seconds, and then switch to Material B. After another 0.25 seconds, they would switch back to Material A.
As of the writing of this documentation, the default value is 0.25. The value must be greater than or equal to 0 (zero).
Construction Delay
As walls are being constructed, the segments in the wall start their construction at different times, whereas all hubs start construction immediately. Segments begin their construction sequentially, starting with the segment closest to the origin hub of a wall, and ending with the segment farthest from the origin hub. The delay between the start of construction of each segment is equal to the time it takes for a given percentage of the previous segment be built.
For example, if the value of Construction Delay is set to 0.2, then whenever a segment is 20% complete with its own construction, the next segment in the wall will begin its construction process.
As of the writing of this documentation, the default value is 0.2. The value must be greater than or equal to 0 (zero), and less than or equal to 1 (one).
Max Wall Segments Between Hubs
As a player is planning a wall, segments are placed in-between hubs. This configuration variable indicates the maximum number of consecutive segments that may be built between two hubs.
For example, if the value is 5, then it would be possible to build a wall consisting of 5 segments bookended by a hub, but it would be impossible to build a wall with 6 or more consecutive segments (without some serious finicking by the player).
As of the writing of this documentation, the default value is 5 (five). The value must be greater than or equal to 1 (one).
Max Build Inclination
Sometimes a player may attempt to build a wall that intersects with impassible terrain. As of the writing of this documentation, there isn't any data layer for terrain which indicates passability. As such, we instead calculate the angle of incline between the origin points of consecutive wall pieces to determine if the terrain is passable or not. If the angle exceeds the Max Build Incline, the wall will be considered invalid after that point, and will be replaced by a hub, followed by double-length segment. As of the writing of this documentation this feature has not yet been implemented.
For example, if two consecutive wall pieces were being built on sloped terrain that ascended or descended at a 45 degree angle, and the value of this variable was set to 50, then the wall would consider its placement valid. If the value was instead 15, the placement would be considered invalid.
As of the writing of this documentation, the default value is 90.0 (ninety). The value must be greater than or equal to 0.0 (zero), and less than or equal to 90.0 (ninety).
Radius
This variable should be the radius of the static/skeletal mesh for the hub. If the mesh is not perfectly cylindrical (realistically, this will never happen), it should be the radius of the largest cylinder that will fit within the hub's mesh. This is used to determine how hubs are positioned when building a wall.
For example, suppose the mesh is roughly cylindrical, and when viewed from above is a regular hexagon. In this case, the radius would be the distance from the center of the hexagon to the center of one of the edges of the hexagon (The line between these two points should be perpendicular to the edge).
As of the writing of this documentation, the default value is 0.0 (zero). The value should be given in the default UE unit (probably centimeters). The value must be greater than 0.0 (zero).
Spawnable Wall Hub Config
Instead of assuming that a wall hub builds more versions of itself, we expose to the designers the option to change that with this variable. As such, this variable should be set to reference a wall hub entity configuration data asset to indicate what type of wall hub this hub will be building.
To make a hub spawn more of itself, simply set this variable in the entity configuration to reference the very same entity configuration data asset.
As of the writing of this documentation, the default value is nullptr. The value must be set, or wall-building functionality will not work.
Spawnable Wall Segment Config
Like the spawnable wall hub config, above, this variable specifies what type of wall segments this hub will construct when building walls from it.
When selecting which wall segment you want to use, be sure to specify the normal-length segment for this variable. Double-length segments are specified below.
As of the writing of this documentation, the default value is nullptr. The value must be set, or wall-building functionality will not work.
Spawnable Double Wall Segment Config
Whenever a wall would intersect with impassible terrain, the wall should be cut short, and ended with a hub, followed by a double-length wall segment. This variable allows you to specify the entity configuration data asset that this hub will use to build double-length segments should it need to.
As of the writing of this documentation, the default value is nullptr. The value must be set, or wall-building functionality will not work.
RTSWallSegmentConfig

In addition to the configuration options available to all buildings, the following should be set for wall segments as well:
Length
This variable should be equal to the length of the longest edge on the wall segment's static/skeletal mesh. This, like the radius variable for hubs, is used to determine how wall segments are positioned when building them.
For example, suppose you model a wall segment that is 1 (one) unit thick, 5 (five) units tall, and 10 (ten) units long. In this case, the value of this variable would be 10 (ten).
As of the writing of this documentation, the default value for this variable is 0.0 (zero). The value must be given in the default UE unit (probably centimeters). The value must be greater than 0.0 (zero).
Spawnable Buildings
This variable is an array of building configurations, indicating what buildings can be built from this wall segment, destroying the segment in the process.
For example, you could add a tower or gate to this array, and it would then be made available to the player to construct from wall segments using this configuration.
As of the writing of this documentation, functionality based on this variable has not been implemented, and the default value for this variable is the empty array. Array elements must be, or have inherited from, URTSBuildingConfig.
Start Construction After Spawn
This variable is not something newly added to the wall segment configuration class; however, it is important to note. For all wall segment configurations, the value of this variable should be set to false (unticked), in order for their construction animations to work properly.
Reason being, most buildings start constructing automatically after they're spawned into the world. However, wall segments need to all spawn simultaneously when constructing a wall, but begin their construction animations in sequence, rather than all at once. When this variable is set to false (unticked), it keeps the segments in a holding state until the animation is allowed to begin from an independent function call. If the value of this variable is left as true, expect to see snapping in the animation, as the building jumps around to different points in its animation as that independent function gets called while the building is already constructing.
this functionality is different from the original functionality of this variable. Before, this variable, if left as false (unticked), would cause the building to be instantly constructed, rather than to be constructed over time if left as true (ticked). Now, the variable, if left as false, leaves the building in an un-constructed state, awaiting the function call that allows it to begin.
State of development
The implementation for the walls system has reached a stable point in its development, but it is not yet complete. It is best to think of it as being in a first-draft state, which we will refer to as a "Tier-0" (tier zero) implementation. Successive updates to the system will be subsequently named "Tier-1", "Tier-2", and so forth. Below, we enumerate the various features of the wall system and the state of each of their developments.
Tier-0
As a player, I must be able to build wall hubs via a builder
- The player can presently build demo wall hubs. No final art or animations are in yet for any faction.
As a player, I must be able to plan a wall of arbitrary length in an arbitrary direction from a given hub
- The player can plan a wall of arbitrary length in an arbitrary direction (360 degree rotation around the Z-axis) so long as their mouse cursor does not leave the landscape of the map. Doing so freezes the planning process.
As a player, I must be shown when my planned wall is unable to be built
- Players are able to see when a wall cannot be built due to any of three factors, in descending order of severity: invalid placement on terrain, too far from one of the player's fortresses, and not enough resources to fully build wall. However, while the code framework has been set up for the "too far from a fortress" condition, the implementation has not yet been completed for that one yet.
As a player, I must be able to build a valid planned wall
- Players may build a planned wall like when placing any other building.
As a player, wall pieces that I build must snap to terrain
- As players plan out a wall, wall pieces automatically adjust their position on the Z-axis to snap to the landscape around them. The implementation of this relies on casting a ray from a point a very long distance above each piece to a point a very far distance below each piece, and finding where that ray intersects with terrain. If there is a better implementation for this functionality, this should be improved.
TODO
As a player, I must not be able to construct walls that intersect with other buildings
- At present, a player can construct walls through other walls that are still under construction. This may be due to a lack of collisions on wall segments, which was not set to allow for units to pass through under-construction wall segments.
As a player, I must not be able to construct a wall if any piece of it is too far from one of my fortresses
- At present, this feature is not yet implemented, though the framework for the implementation to be easily integrated into the existing solution is established. See ABFMEPlayerController::ManageWallPieceMaterials.
As a player, the walls I plan to intersect with invalid terrain must be cut short and ended with a hub followed by a double-length wall segment
- A demo model with a demo construction animation have been created for a double-length wall segment, along with its entity configuration data asset. Furthermore, a pointer to such an asset has been added as a UPROPERTY to all wall hub configs. Implementation of the algorithm to determine when to cut off a wall being planned, and implementation of how to place the pieces of such a wall have not been completed.
As a quality tester, the walls system should provide me relevant information via BFME: Reforged standard logging
- Logging implementation is limited, presently. Most logging is just an indication of an error (e.g. null pointer) which is used to avoid a crash in the unreal engine. Other logs, such as system warnings for gracefully-handle-able errors are few and far between, and just about zero logs are output for expected program behaviors. However, the implementation does adhere to BFME: Reforged project standards for logging.
As a player, I must not be able to connect my walls to any other players' walls
- How the walls system behaves in multiplayer situations is wholly untested and unconsidered as of the writing of this documentation.
As a player, I must not be able to see other players planned walls, and vice versa
- How the walls system behaves in multiplayer situations is wholly untested and unconsidered as of the writing of this documentation.
As an AI, I must be able to plan and construct walls just like any human player
- AI ability to construct walls should be functional, so long as AIs use BFMEPlayerController. If they don't, then the walls implementation will need to be refactored into a class that both human player controllers and AI player controllers inherit from. Furthermore, no work to develop AI wall building capabilities has been completed as of yet.
As a player, I must be able to build towers, gates, etc. in my walls
- Wall segments have been set up such that in the future this functionality may be implemented (i.e. the Spawnable Buildings property); however, no specific design or implementation has been finalized as yet for this feature.
Architecture
The implementation of the walls system is built across several interoperating classes & systems. The key classes to take note of are the following:
- ARTSPlayerController
- ARTSBuilding
- ARTSWallHub
- ARTSWallSegment
- URTSWallHubConfig
- URTSWallSegmentConfig
- ARTSBuildingCursor
The following blueprints are also of note:
- BP_Building_Cursor
The majority of actual functionality for the walls system resides squarely in ABFMEPlayerController. This is because wall construction requires keeping track of a variety of data, including the positions of multiple ABFMEBuildingCursors, the entity handles that are spawned as the buildings get constructed, and the relationships between each set of constructed wall pieces. This information is not well-suited to being tracked within any of the wall piece classes (i.e. AWallHub & AWallSegment).
Wall planning and construction themselves follow a multi-step process:
- Player clicks on the "build a wall" button after selecting an existing wall hub, the origin hub.
- System calculates distance between origin hub, and where the player's cursor intersects with the terrain. See ABFMEPlayerController::PlanWall
- Using this distance, the system calculates how many segments and how many hubs are needed to span the distance, taking into account spacing rules specified in the hub configuration files. See ABFMEPlayerController::GetWallPiecesNeededToSpanDistance
- System then manages the lifecycle of spawned ABFMEBuildingCursors, creating new ones and destroying extraneous ones to match the calculated demand for hubs and segments. See ABFMEPlayerController::ManageWallPieceLifeCycles
- System then positions each hub and segment into place along the line between the center of the origin hub and where the player's cursor intersects with the terrain. See ABFMEPlayerController::RelocateWallPieces
- System then colors each hub and segment according to the coloring rules defined for all wall pieces. See ABFMEPlayerController::ManageWallPieceMaterials
- The coloring process also indicates whether the wall can be built as a whole, and that information is stored in ABFMEPlayerController::m_ValidWallPieces for later
- As the player moves the cursor around the terrain, these steps are repeated every tick to correctly position, color, etc. each wall piece while the player remains engaged with wall planning.
- The player, after finding a valid set of locations for building all pieces of the wall they are planning, confirms their intent to construct the wall (as of the writing of this documentation, by clicking the left mouse button).
- The system begins wall construction, moving any units out of the way of constructing buildings. All ABFMEBuildingCursors are also destroyed at this time. See ABFMEPlayerController::BeginWallConstruction
- The system spawns in all wall pieces simultaneously. Construction of wall hubs begins "instantly" (after a 0.01 second delay). Construction of each wall segment is set to begin after a calculated delay, based on how far that segment is from the origin hub. Segments further away start construction later than closer segments. See ABFMEPlayerController::BeginWallConstruction and ABFMEPlayerController::ServerBeginWallConstruction
- Wall piece construction completes.
Some further considerations:
- BP_Building_Cursor and ARTSBuildingCursor were updated to add in colors and controls for more building cursor states than just "valid" and "invalid". It now has the capability to handle the "other nearby buildings are invalid", "you don't have enough resources", and "I'm too far away from a fortress" states, along with a new color for each. As of the writing of this documentation, the colors are yellow, green, and blue, respectively. Recall that valid buildings are grey, and invalid buildings are red.
- ARTSBuilding and several adjacent classes (e.g. URTSConstructionSiteComponent) have been updated to accommodate several necessary changes for the wall system/implementation, or have been updated merely to better conform to coding syntax standards (sometimes both).
Limitations
The limitations of the current implementation are listed in the State of development section, at least as far as functional limitations go. If a further examination of limitations is required, please notify someone in the Who's worked on it section, below, to update this section and specify what you would like details on.
- Building cursor spawning and positioning are currently separate steps, as you will note in the Architecture section, above. As such, wall pieces are, at present, spawned inside the origin hub, and then near-instantaneously teleported to their proper positions. As such, if the spawned wall pieces' meshes are larger than the origin hub's mesh, the player may see odd behavior, as meshes flicker into and out of existence while they briefly reside inside the origin hub. This may be especially concerning for double-length wall segments, and on machines with low performance that cannot maintain high tick rates.
- When spawned, all wall hubs are built with a 0.01 second delay between when construction desire is confirmed by the player, and when the hubs are actually spawned. As such, something could happen in the space where a wall hub will be built in that short time before it is built which would normally not be permissible. This could be especially concerning if a player uses macros or external programs to automate certain game functions, potentially permitting them to overlap multiple buildings into the same space in the game. The implementation is like this right now because it keeps the implementation of spawning for wall segments and wall hubs the same (wall segments must be built with a delay).
Known issues
Known issues with the current implementation are listed in the State of development section. If a further enumeration of known issues is required, please feel free to perform a QA pass on the system, testing out the user stories listed above and examining edge cases. A record of them can be kept here, as well as in the issue tracker (preference goes toward the issue tracker).
- When you first boot up Unreal Engine, and try to build a wall, it may fail. It won't crash the editor, but it'll simply seem like you didn't click on anything at all. If you check the logs, you should see that a bunch of errors about "missing segment config" are spamming the log. As a workaround, you can stop the game and open the wall hub's entity configuration file. Inside, reset the value of Spawnable Wall Segment Config to be empty, and then set it back to the same value it was just at. Save the asset and then play the game again. From here onward, that error shouldn't appear anymore until you close and reopen the UE editor. Ultimate resolution/root cause of this issue is presently unknown.
Logging
Custom logging was added in the form of MACROS to make the logging more user friendly and to give us the ability to enable or disable certain logging during debugging. The MACROS are placed in theRTSPCH.h/cpp files and are globally available. In order to toggle the logging categories on/off, enter the command "Log TheLogCategory" in the command line.
Unreal logging uses logging categories and verbosity levels. Every system should have its own logging category. For example, a Fortress could have its own category named FortressBuilding. In the log files, you would then see that every message logged by the Fortress, starts with "FortressBuilding: ...". This makes it clear what messages belong together.
In total, there are 7 verbosity levels:
| Verbosity Level | Printed in Console? | Printed in Editor's Log? | Notes |
|---|---|---|---|
Fatal | Yes | N/A | Crashes the session, even if logging is disabled |
Error | Yes | Yes | Log text is coloured red |
Warning | Yes | Yes | Log text is coloured yellow |
Display | Yes | Yes | Log text is coloured grey |
Log | No | Yes | Log text is coloured grey |
Verbose | No | No | |
VeryVerbose | No | No |
If you want some more information about logging, read the following Wiki page.
1. Default logging
The new default logging MACROS are:
LOG_INFOLOG_WARNINGLOG_ERROR
which respectively log Default, Warning and Error messages to our custom default logging category named LogDefault. These log messages will by default also log the name of the function in which the logging took place. An example on how to use them:
LOG_INFO("%d?! That's not bad for a pointy-eared Elvish princeling.", 42);
As you can see, you just make your message the same way as you would with the UE4 logging system.
2. Conditional Logging
Conditional logging was also added. The default conditional log MACROS are:
CLOG_INFOCLOG_WARNINGCLOG_ERROR
Another example on how to use them:
CLOG_WARNING(
    bHadFirstBreakfast,
    "We've had one, yes. What about second %s?",
    *BreakFast->GetName()
);
This will only log if the first argument, the condition, is true.
3. Making new categories
Go to the RTSPCH.h/cpp files to make new logging categories. In here, you will find commented examples, which you can copy, paste and change with your new category.
- You should declare your new category in RTSPCH.h with DECLARE_LOG_CATEGORY_EXTERN(PutYourCategoryHere, DefaultVerbosity, CompileTimeVerbosity);
- You should initialize your new category in RTSPCH.cpp with DEFINE_LOG_CATEGORY(PutYourCategoryHere);
- Define your new MACROS in RTSPCH.h.
Gameplay Ability System
The Gameplay Ability System, or GAS, is a system made by Epic Games. It's a framework which developers can separately implement into their project and customize to their liking. The system utilizes the following core functionalities for creating and handling abilities:
- Gameplay Abilities
- Ability Tasks
- Gameplay Attributes
- Gameplay Effects
Learn more with UE4's documentation
Documentation for GAS is sparse. These are the best resources we've found besides what Unreal provides:
What do we use GAS for?
We aim to use GAS for handling Abilities, Attributes, Units Effects, Attacking and Damage Calculation, Health Points and tracking other values (like Resources/Power Points/Experience). For example, we aim to use the system for Hero Abilities, Powers, Passives (buffs/debuffs), and anything alike that requires complex handling or tracking.
Right now we've implemented the framework itself, which is quite complex for a custom project, and are ready to build upon that.
RTS Framework Implementation Specifics
Targeting
We can't use GAS to manage the targeting directly. This would create a target indicator for every unit on a horde because it is designed with FPS/MMO in mind. We use our developed targeting methods SingleTargetAbility and AreaTargetAbility, that are adapted to use GAS.
Ability Tasks
GAS has an Ability Task limitation of about 1000. As such, we do not use Ability Tasks to handle basic attacking. They should be used with care, for things like real abilities (hero, spells) which aren't concurrently heavily used.
Youtube Tutorial Videos
-
Using the Gameplay Ability System | Unreal Fest Europe 2019 | Unreal Engine
-
Benefits and Pitfalls of Using Gameplay Abilities Framework | Unreal Fest Online 2020
Bugs
In order to report bugs, open an issue in the Framework repository, adding the "bug" label.
Folder Structure
Basic Rules
When you create new Assets or Folder make sure that you follow these simple rules:
In any Name never use the following unless absolutely neccessary:
- Whitespace of any kind
- Backslash
\ - Symbols e.g.
!$%@ - Any Unicode character
In any Name you should:
- Adhere to the following RegEx:
[A-Za-z0-9]+ - Use underscores as sparingly possible unless it is for suffixes
- Resort to PascalCase
The reasoning for this ensures compability across all platforms and tools and help prevent downtime due to potentially bad characters for names in assets/folders you don't control.
Directory Structure
Consider the directory structure of our project like a law, a violation causes unneeded chaos.
Folder Names
Always use PascalCase
PascalCase refers to a naming convention with a capital letter and then instead of using spaces, every following word also starts with a capital letter. For example: EntityConfig, UnitConfig or PlayerController
Never use Spaces
Reinforcing the above, never use spaces. Spaces can cause various tools and processes to fail. Ideally your project is in a path that doesn't contain spaces like D:\BFMEReforged\ instead of C:\Users\MyUser\My Documents\Unreal Projects\BFMEReforged
Never Use Unicode Characters or other symbols
If on of your assets should be named Barad-dûr, its name should be BaradDur. Unicode characters can be worse than spaces for certain tools and Unreal doesn't support unicode paths either.
using Characters outside a-z, A-Z, and 0-9 such as @, $, #, ,, and * can also lead to unexpected issues that might be hard to track.
Folders for Assets
No Global Assets
Every Assets should have a purpose, otherwise it doesn't belong in the project. If an asset is for experimental testing and shouldn't be used by the project it should be put in your Developer folder.
Reduce Migration Conflicts
When working in a seperate Project to test out new features it is common to copy the assets over. When you find yourself in this situation it is best practice to use the Content Browsers Migrate tool as it will copy over not just the selected assets but also required dependencies.
After a migration, safe merging can be done using the Replace References tool in the Content Browser.
All Map Files belong in the Levels Folder
Being able to tell someone to open a specific level and not having to explain where said level is located is a great time saver. You might want to place your map inside a subfolder of Levels.
Use the Core Folder for critical Blueprints or other Assets
Use the /Content/Core folder for assets that are absolutely fundamental to the project. For example base GameMode, GameState, PlayerState, PlayerController, and related Blueprints shoud be located here.
This creates a very clear dont touch these message for other team members. Non-Programers should have little reason to enter the Core folder.
For example, if you want to create a Pick up that can be placed in the world, there should be a base PickUp class in Core that defines base behavior for a pickup. Specific pickups such as a Health or Armor pack should exist in a folder such as /Content/Placeables/Pickups/. Designers can define and tweak pickups in this folder as they see fit, but they shouldn't touch Core/PickUp as they may unintentionally break pickups project-wide.
Do not create folders called Assets or AssetTypes
Creating a folder named Assets is redundant
All assets are considered assets.
Creating a folder named Meshes, Textures, or Materials is redundant
All asset names are named with their asset type in mind (Prefix/Suffix). These folders offer only redundant information and the use of these folders can easily be replaced with the filtering system the Content Browser provides.
Want to view only static meshes in Environments/Rocks/? Simply Turn on the Static Mesh filter.
 Alternatively search for SM_ (the prefix for Static Meshes)

When searching this way and the prefixes being applied correctly, Unreal should sort these assets alphabetically.
Very large Asset(s/ets) get their own folder layout
There can be certain asset types that have a huge volume of related files where each asset has a unique purpose. The two most common are Animation and Audio assets. If you find yourself having 15+ of these assets that belong together, they should be together.
For example, animations that are shared across multiple characters should lay in Characters/Common/Animations and may have sub-folder wsuch as Locomotion or Cinematic.
This does not apply to assets like textures and materials. It is common for a Rocks folder to have a large amount of textures if there are a large amount of rocks, however these textures are generally only related to a few specific rocks and should be named appropriately. Even if these texture are part of a Material Library.
Material Library
Master Materials, Layered Materials or any form of reusable materials or textures that do not belong to any specific asset should be located in Content/MaterialLibrary.
This way all global materials have a place to live and are easily located.
The Material Library does not have to consist of purely materials. Shared Utility Textures, material functions and other things related to this should be stored here as well within folders that designated their intended purpose. For example, generic noise textures should be located in MaterialLibrary/Utility.
Any testing or debug Materials should be within MaterialLibrary/Debug. This allows debug Materials to be easily stripped in the cooking process and makes it incredibly obvious if production assets are using these.
No Empty Folders
There shouldn't be any empty folders. They clutter the content browser.
If you find that the content browser has an empty folder you can't delete, you should do the following:
- Be sure you have Source Control enabled.
- Immediately run the
Fix Up Redirectorson the Project folder. - Navigate to the folder on-disk and delete the assets inside.
- Close the editor
- Make sure your Source Control is in sync.
- Reopen the editor. Confirm everything is still working as intended.
- Ensure the folder is now gone.
- Submit changes to Source Control.
Asset Naming Conventions
We use Unreal's naming conventions, plus some other recommendations:
Form: (Prefix_)AssetName(_Number)(_Suffix)
Example: T_Rock_01_D
Asset names
Prefixes:
(by usage)
CH_ Characters
UI_ User Interface
VH_ Vehicles
WP_ Weapons
(by type)
A_ Animations
BP_ Blueprint
SK_ Skeletal Mesh
SM_ Static Mesh
AD_ Apex Destructible Asset
AC_ Apex Cloth Asset
MT_ Morph Target
ST_ Speed Tree
PS_ Particle System
LF_ Lens Flare
VF_ Vector Field
S_ Sound
SC_ Sound Cue
M_ Material
MI_ Material Instance
MITV_ Material Instance Time Varying
MF_ Material Function
MPC_ Material Parameter Collection
T_ Texture
SP_ Sprite
SS_ Sprite Sheet
TC_ Texture Cube
RT_ Render Target
PM_ Physical Material
Suffixes:
(textures)
_BC Base color
_MT Metallic
_S Specular
_R Roughness
_N Normal
_DP Displacement
_AO Ambient Occlusion
_H Height Map
_FM Flow Map
_L Light Map (fake)
_M Mask
(meshes)
_Physics physics assets (generated name)
_FaceFX FaceFx assets
(animations)
_BlendSpace blend space (generated name)
_AnimBlueprint animation blueprint (generated name)
Code Naming Conventions
We use the Unreal Engine's Coding Standard.